How to Make a Twitter Bot With Python
Bots are becoming increasingly common on Twitter. Learn what options you have to make one. Use Python and an AWS Lambda Function to develop your own Twitter bot for free.

Table of Contents
- What is a Twitter Bot?
- What Are the Alternatives to Make a Twitter Bot?
- How to Make a Twitter Bot Using Python and AWS Lambda
- Conclusion
15% of Twitter users might be, in reality, bots. Businesses, brands, and influencers use bots to manage their Twitter accounts. Even I made my own not long ago.
If you're here, I guess you want to make one yourself. This article will show you how. You'll learn about the different options available to make a Twitter bot for free. And, if you have a technical background, you'll learn how to code and deploy a bot using Python and AWS Lambda.
By the end of this article, you will know:
- What is a Twitter bot
- What options you have available to make a Twitter bot
- How to develop a Twitter bot using Python
- How to deploy your own bot as an AWS Lambda function
Let's get to work!
What is a Twitter Bot?
It's a Twitter account managed via the Twitter API that performs actions in an automated manner. Most of what you regularly do through Twitter's graphical interface is also available through its API. For instance, you could automate sending tweets at scheduled hours, replying to tweets with a predefined text, or following/un-following other accounts.
Even though the Twitter API is quite flexible, there are limitations you should keep in mind. According to Twitter's Automation rules, here's what your bot can do:
- Tweet helpful information
- Reply to users who engage with your content
- Respond to direct messages
- Try new things without breaking the rule
And here's what your bot cannot do:
- Violate any of these rules
- Abuse the Twitter API or attempt to circumvent rate limits
- Try to automate its behavior through the use of other mechanisms besides the Twitter API
- Spam users through tweets or unsolicited direct messages
Next, you'll see the available options to make your own bot.
What Are the Alternatives to Make a Twitter Bot?
Depending on what you aim to do, you have multiple options to make a bot. Some of them require little coding skills. Others require experience deploying Docker containers. In terms of costs, you'll find free and paid alternatives.
Here are the most popular ones:
Social media automation platforms: If your only goal is to sent tweets at fixed schedules, you could use this option. Platforms such as Buffer and SocialOomph offer services to automatically schedule tweets.
- Pros: No-code, very easy to set up
- Cons: Only available through a paid subscription (Buffer) or a limited free-plan (SocialOomph)
Amit Agarwal's Google Script: There's a popular Google Script used for making Twitter Bots. It lets you automate tweeting, sending direct messages, and retweeting at a predefined rate. But you'll need to give it access to your Google account data. Here's a good tutorial about it.
- Pros: Free, low-code, easy to set up
- Cons: Needs access to your Google account's data, likely hard to customize outside of predefined behavior, lacks documentation
Deploy a bot to a server: If you have a technical background, you could code your bot in your preferred programming language and deploy that to a server. There are good tutorials for Python and NodeJS.
- Pros: Fully customizable, available for free or very cheap
- Cons: Hard to set up
Deploy a bot as a serverless function: If you have some programming experience, you could go this route. It'd allow you to make a bot in languages such as Python or NodeJS and deploy it as a serverless function.
- Pros: Fully customizable, free for many use cases (using an AWS Lambda function)
- Cons: Medium difficulty setup
These are the options you could use to make your bot. None is necessarily better than the others. Base your choice on what you want to do with the bot, your programming experience, and your available budget.
In the next section, you'll go through the last described option. You'll learn how to develop and deploy a simple Twitter bot for free using Python and an AWS Lambda function.
For a quick introduction to AWS Lambda functions, read this article's introduction
For covering the basics of Python, take a look these resources
How to Make a Twitter Bot Using Python and AWS Lambda
In this section, you'll develop a Twitter bot using Python and deploy it as an AWS Lambda function. It will follow a simple rule: every day at 10.00 (UTC), it'll post a random tweet from a predefined list. Once you finish the tutorial, you can change the bot's logic to fit your needs.
To create your bot, you'll go through these steps:
- Set up a Twitter developer account
- Create a Twitter App
- Develop your bot locally
- Deploy your bot as an AWS Lambda function
Finally, before you continue, you must have these things in place:
- A Twitter account you want to use as a bot
- Access to an AWS account
- Python>=3.8
- Git
- Docker
- If you're running Windows, you'll need WSL
Set Up a Twitter Developer Account
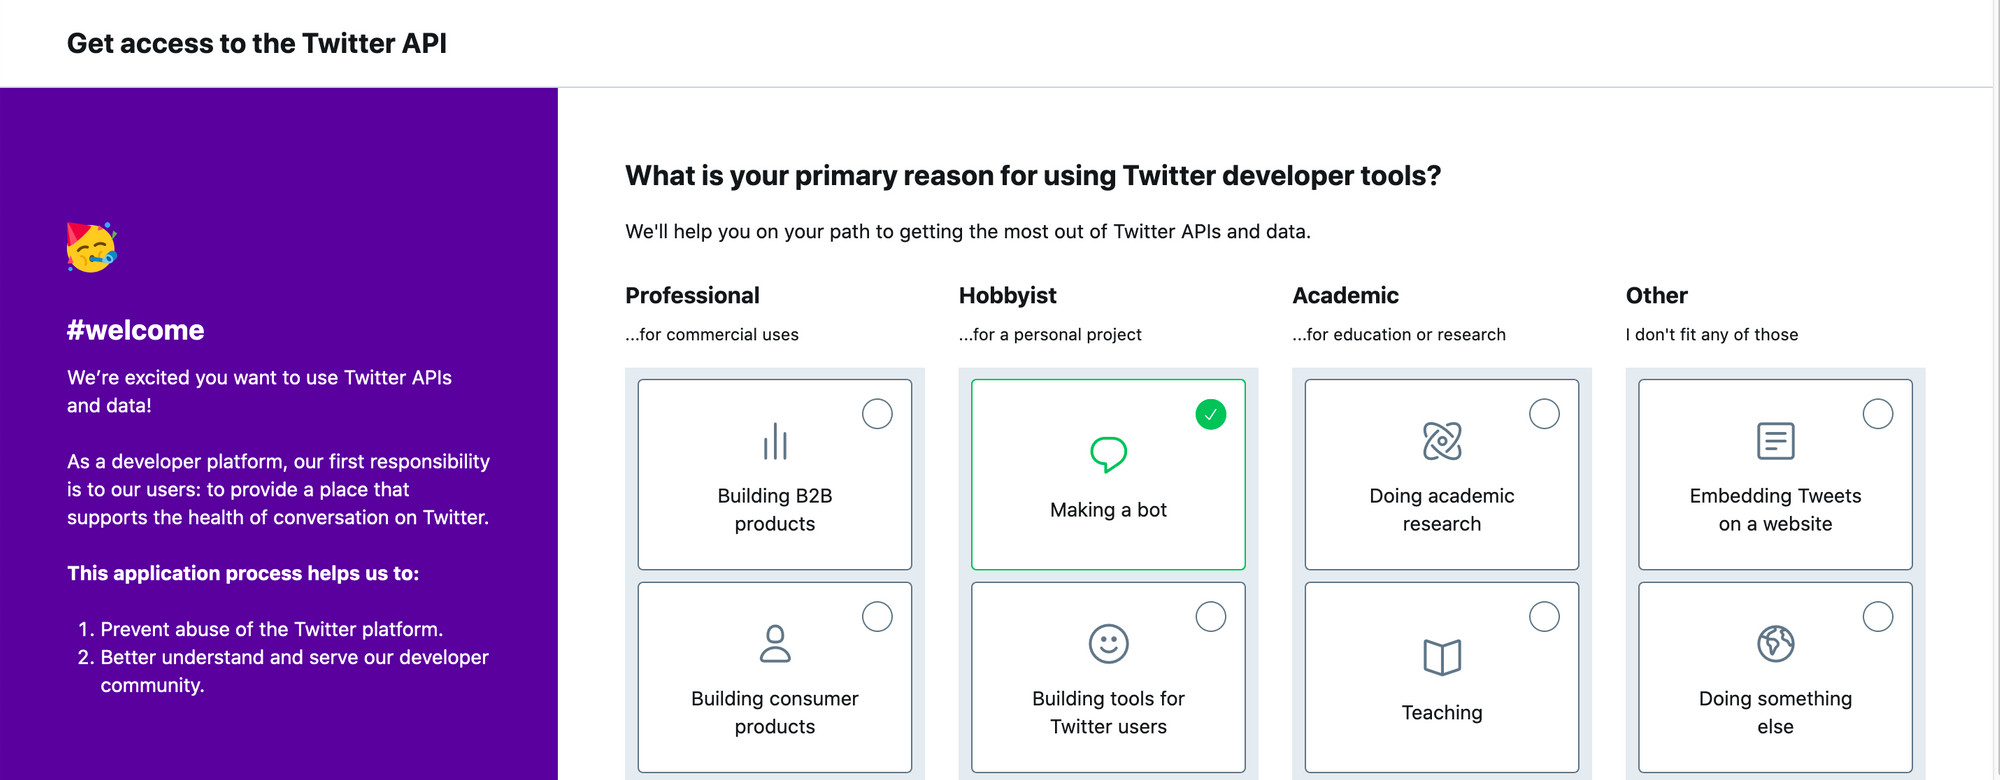
Start by applying for access for a developer account here.
On the What is your primary reason for using Twitter developer tools? section select Making a bot.
Fill in your details on the This is you, right? section and continue. The next block, How will you use the Twitter API or Twitter data? is a bit tedious. You'll need to describe in multiple places how you're planning on using the API.
Here's an example of how I completed the In your words description:
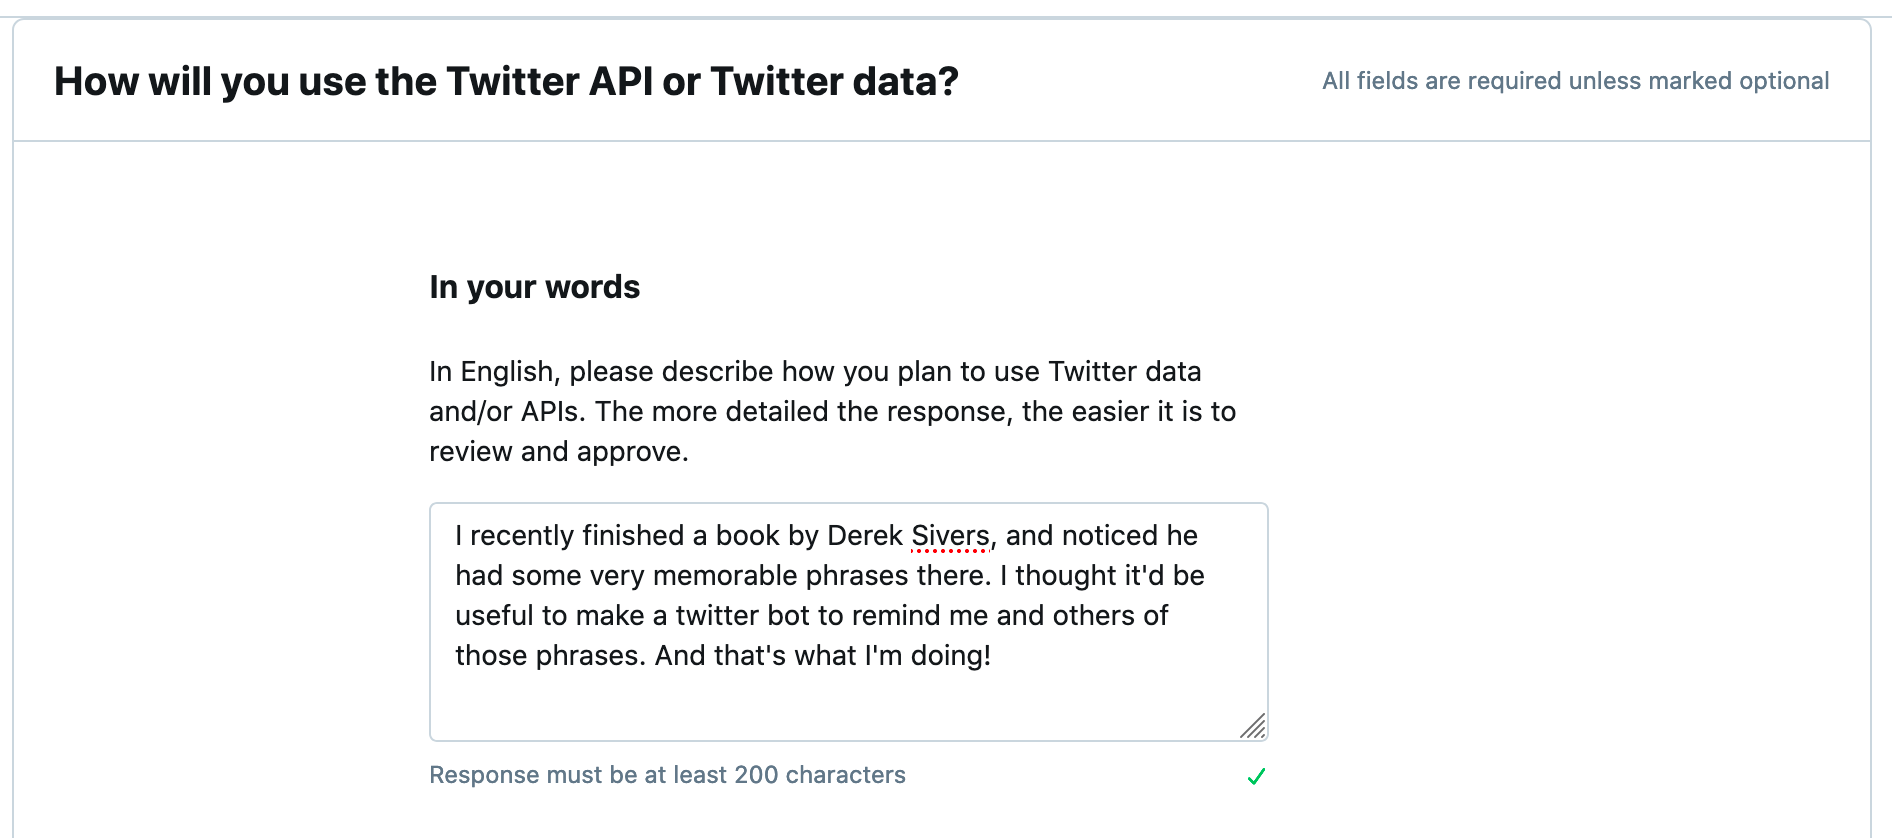
Use a different description than the one I provided above. It's possible that Twitter automatically checks for previously used descriptions and may delay your application by taking it for spam.
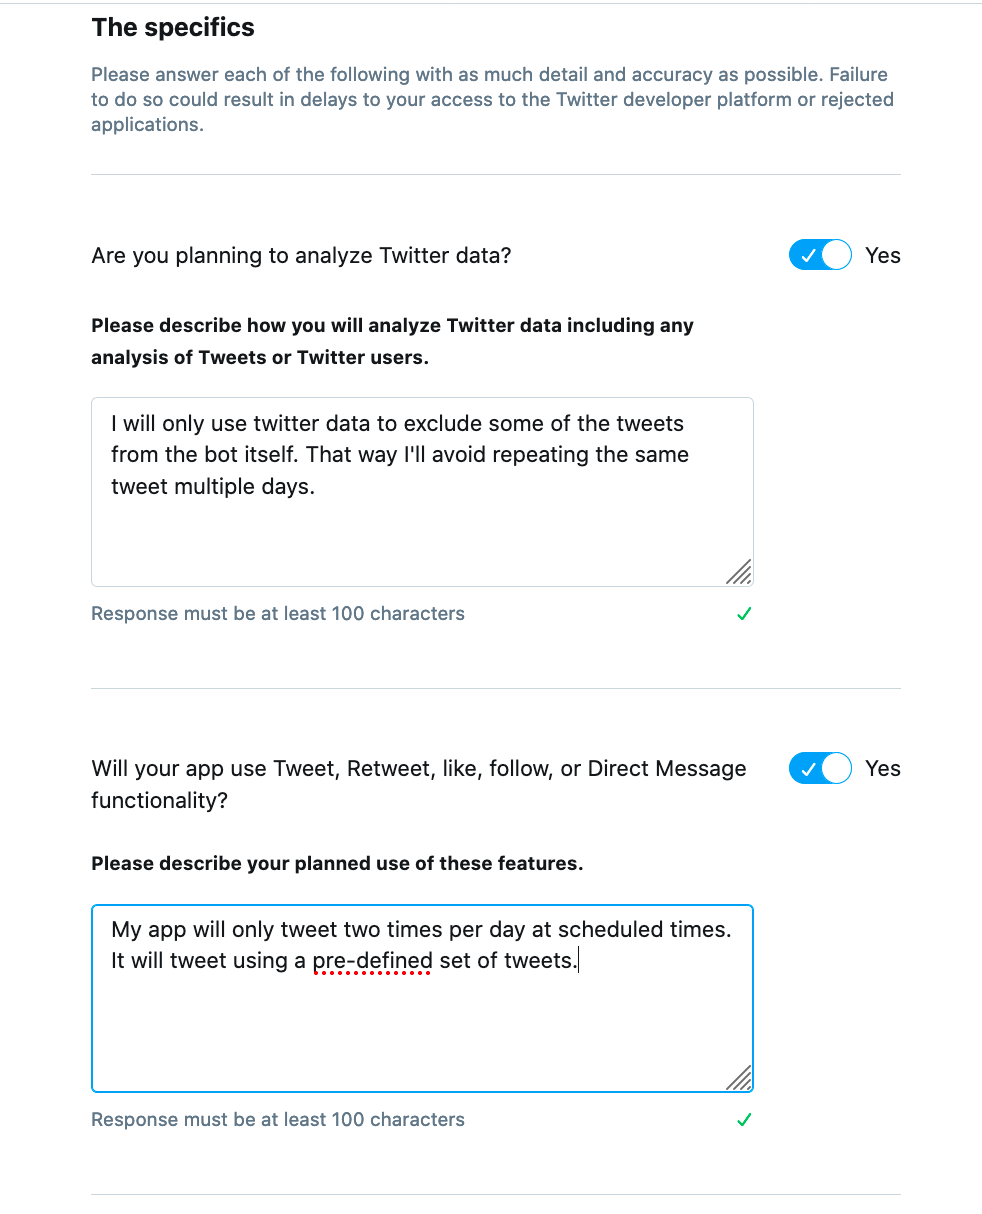
Then, under The specifics sub-header, select Yes for the Are you planning to analyze twitter data? and Will your app use Tweet, Retweet, like, follow, or Direct Message functionality? questions. Select No for the others.
After you finish your application, you'll be asked to check the details and accept the Twitter developer agreement.

Finally, you'll need to confirm your email and will be able to create a new application once your account is approved. This may take up to 48 hours.
Continue to the next section once you're able to access the Twitter Developer Portal.
Create a Twitter App
After your Twitter developer account is approved, you'll get an email directing you to the Twitter Developer Portal. You'll select a name for your App, and get your API Keys. Then, you'll be redirected to your App settings.
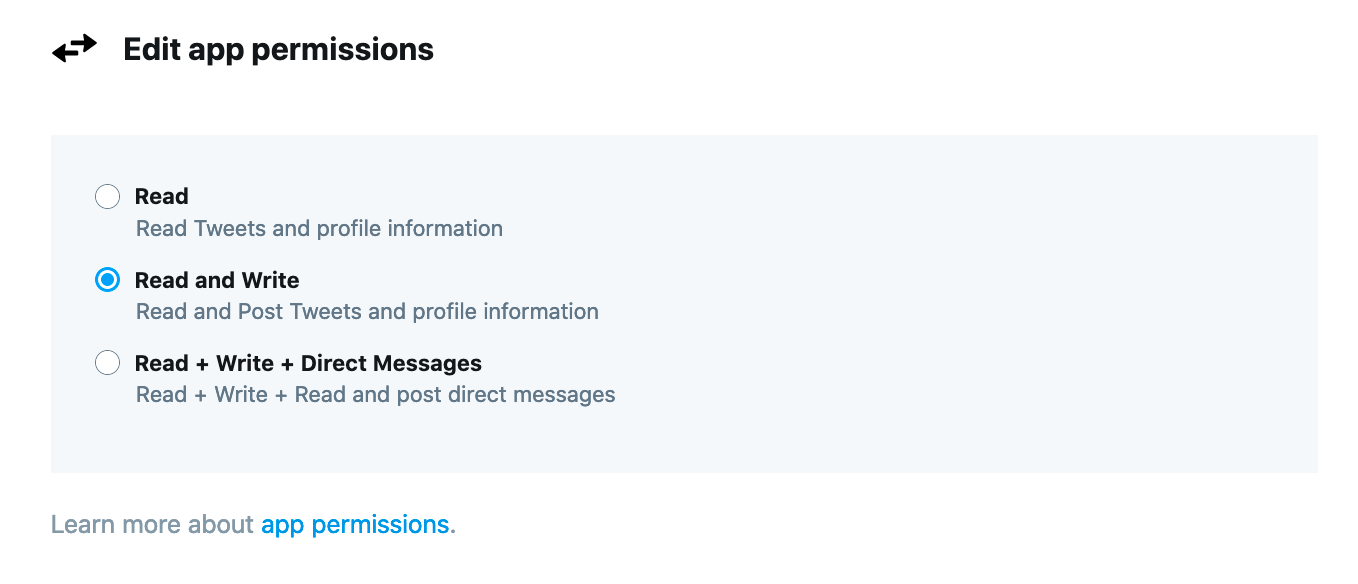
In your App settings, Edit your App permissions.
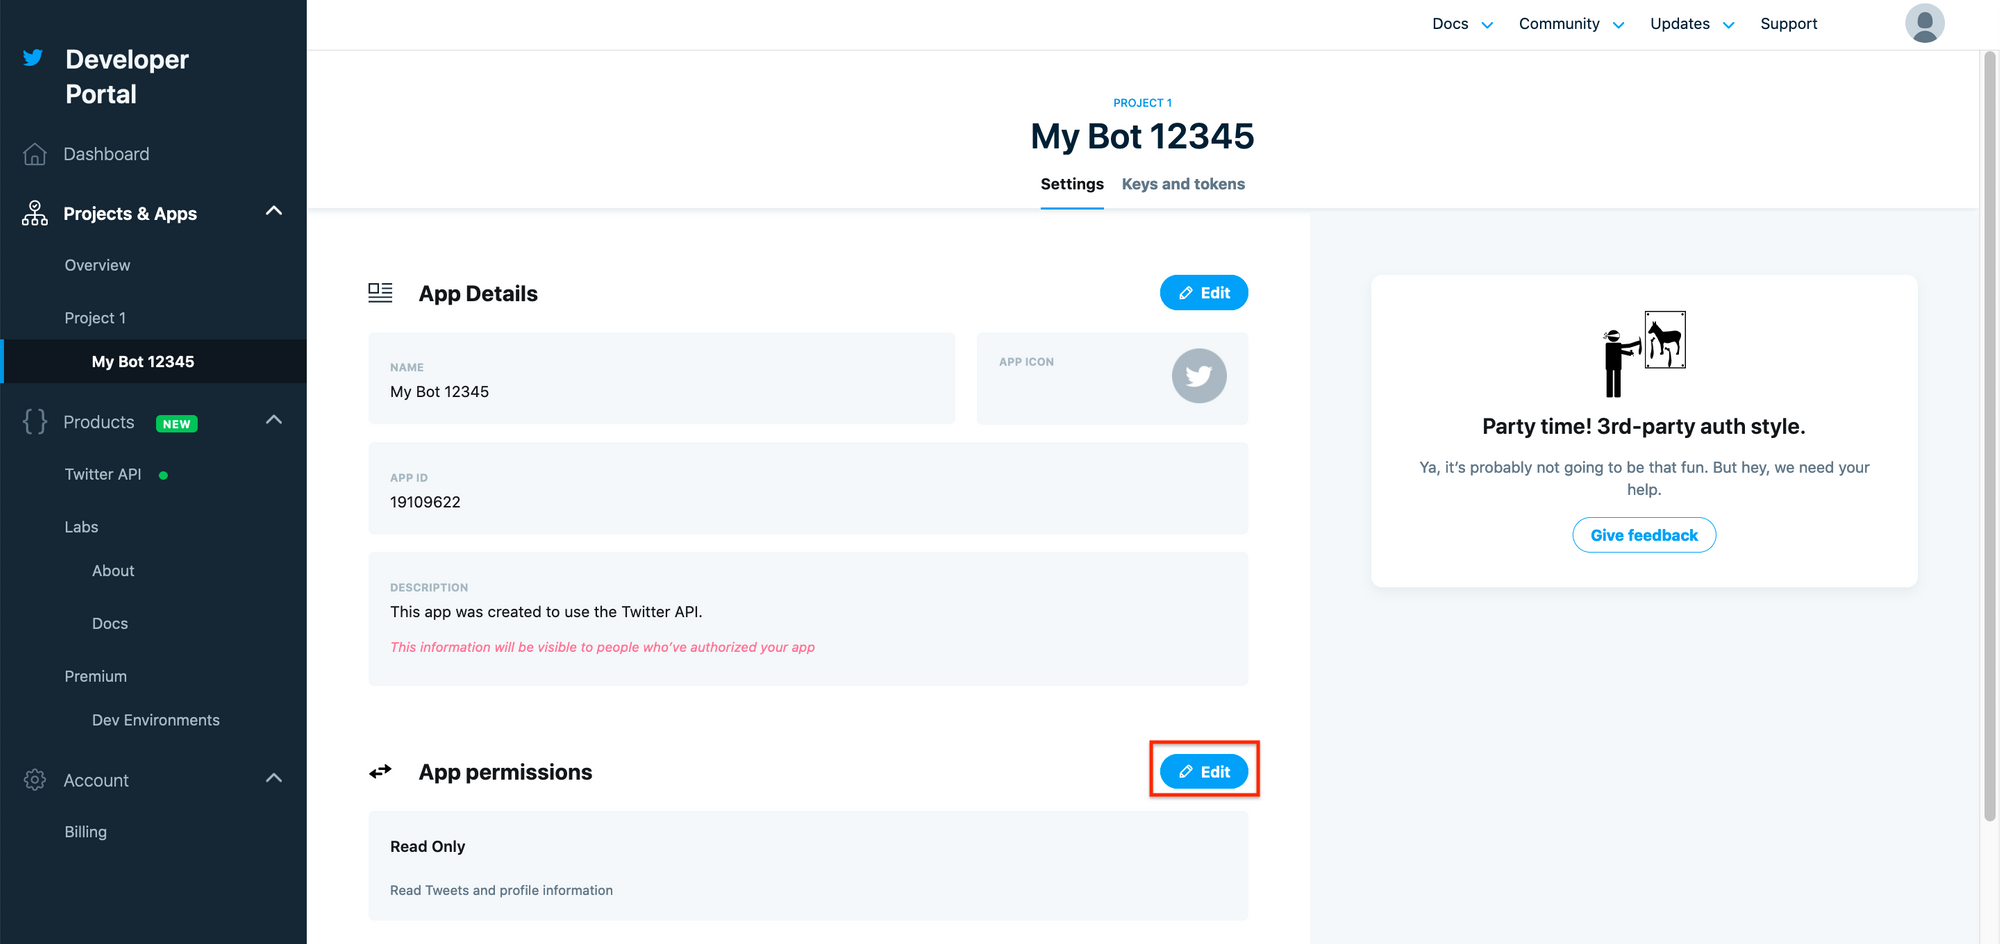
Update your App permissions from Read to Read and Write and save the changes.
After you update your App permissions. Go to Keys and Tokens. There, you'll need to regenerate the API Key and Secret and generate an Access Token and Secret.
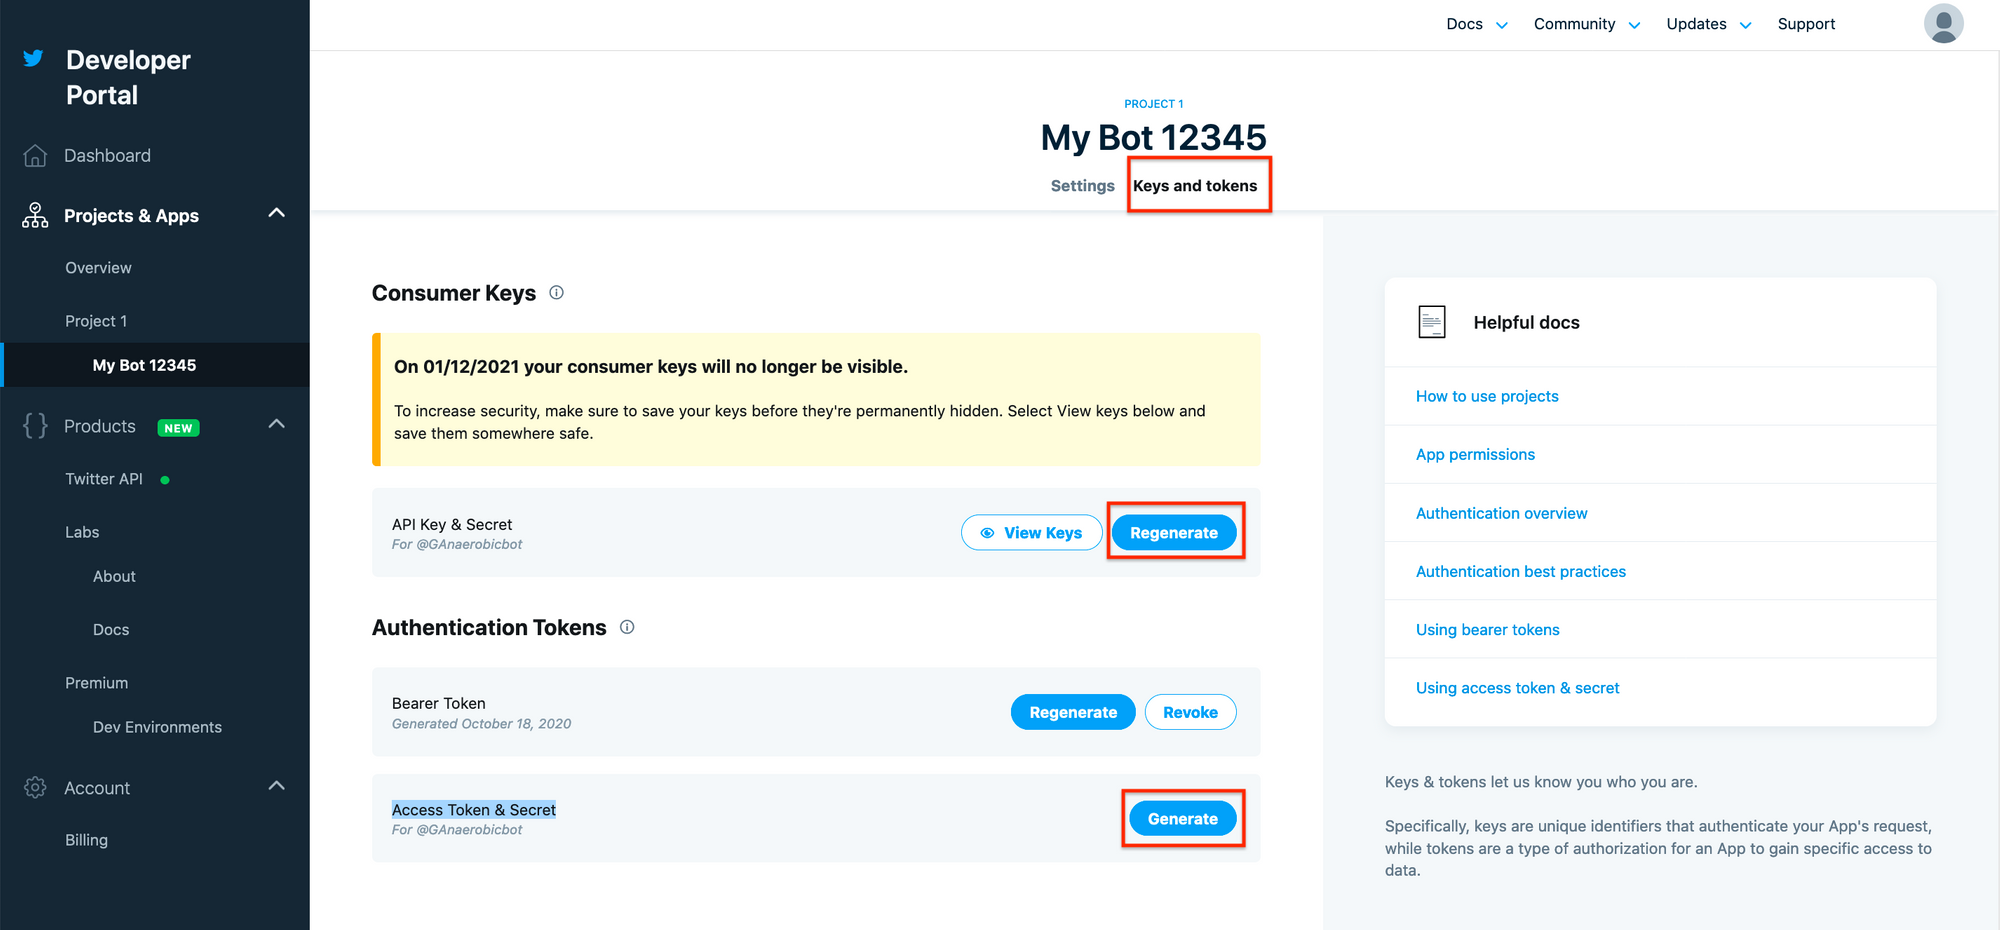
You'll need those credentials to access your Twitter account in an automated manner. Store them somewhere safe.
That's it. You're all set. It's time to get your bot working in your local machine.
Develop Your Bot on Your Local Machine
To test and make changes quickly, you'll work on your bot locally. Once you're happy with its behavior, you'll package it and deploy it as an AWS Lambda function. To help you package your bot, you'll use a repository with some useful scripts.
Follow these steps to setup your local development environment:
1. Clone this repository on your local machine
2. Go to the project's root directory, create a virtual environment and activate it:
python3 -m venv venv
source venv/bin/activate
3. Install the required libraries in your virtual environment using pip:
pip install -r requirements.txt4. Create a file called .env in the root directory of your project. Put your Twitter App Keys and Tokens there:
ACCESS_TOKEN=<YOUR_ACCESS_TOKEN_HERE>
ACCESS_TOKEN_SECRET=<YOUR_ACCESS_TOKEN_SECRET_HERE>
CONSUMER_KEY=<YOUR_CONSUMER_KEY_HERE>
CONSUMER_SECRET=<YOUR_CONSUMER_SECRET_KEY_HERE>
By now, your project's structure should looks as follows:
twitter-bot-python-lambda/
├── venv/
│
├── src/
│   ├── lambda_function.py
│   └── tweets.csv
│
├── .env
├── buildpackage.sh
├── createlambdalayer.sh
├── entrypoint.py
├── LICENSE
├── README.md
└── requirements.txt
Here's the purpose of each of these files:
venv/: Virtual environment with the libraries your project requiressrc/lambda_function.py: Python script containing the logic of your bot. You'll package this code and upload it to the AWS Lambda function.src/tweets.csv: List of predefined tweets your bot uses for posting. This also goes in the package you'll upload to the Lambda function..env: File containing your credentials to authenticate the Twitter API. It's used for testing your bot locally.buildpackage.sh: Utility function that packages the contents ofsrc/into a file calledlambda_function.zip. You'll upload this file to the Lambda function.createlambdalayer.sh: Utility function that packages the libraries specified in requirements into a file calledlayer.zip. You'll upload this file to a Lambda Layer.entrypoint.py: Python script you'll use for testing your bot locallyrequirements.txt: Standard way of specifying the libraries your project requiresLICENSEandREADME.md: License and description of the repository
The most important file in the repository is lambda_function.py. In it you'll define the logic for your bot:
import os
import random
import json
from pathlib import Path
import tweepy
import csv

ROOT = Path(__file__).resolve().parents[0]


def get_tweet(tweets_file, excluded_tweets=None):
    """Get tweet to post from CSV file"""

    with open(tweets_file) as csvfile:
        reader = csv.DictReader(csvfile)
        possible_tweets = [row["tweet"] for row in reader]

    if excluded_tweets:
        recent_tweets = [status_object.text for status_object in excluded_tweets]
        possible_tweets = [tweet for tweet in possible_tweets if tweet not in recent_tweets]

    selected_tweet = random.choice(possible_tweets)

    return selected_tweet


def lambda_handler(event, context):
    print("Get credentials")
    consumer_key = os.getenv("CONSUMER_KEY")
    consumer_secret = os.getenv("CONSUMER_SECRET")
    access_token = os.getenv("ACCESS_TOKEN")
    access_token_secret = os.getenv("ACCESS_TOKEN_SECRET")

    print("Authenticate")
    auth = tweepy.OAuthHandler(consumer_key, consumer_secret)
    auth.set_access_token(access_token, access_token_secret)
    api = tweepy.API(auth)

    print("Get tweet from csv file")
    tweets_file = ROOT / "tweets.csv"
    recent_tweets = api.user_timeline()[:3]
    tweet = get_tweet(tweets_file)

    print(f"Post tweet: {tweet}")
    api.update_status(tweet)

    return {"statusCode": 200, "tweet": tweet}
This is the code of lambda_function.py. There are three parts to it: importing the libraries, the get_tweets function, and the lambda_handler function.
In the first part, you import the required libraries. In addition to some of the standard libraries, you import tweepy, which you’ll use to interact with the Twitter API. Then, you store the path where lambda_function.py is located in a variable called ROOT.
import os
import random
import json
from pathlib import Path
import tweepy
import csv

ROOT = Path(__file__).resolve().parents[0]
Next, you define get_tweet. It takes two parameters and returns the text that your bot will tweet. Take a look at how it works:
def get_tweet(tweets_file, excluded_tweets=None):
    """Get tweet to post from CSV file"""

    with open(tweets_file) as csvfile:
        reader = csv.DictReader(csvfile)
        possible_tweets = [row["tweet"] for row in reader]

    if excluded_tweets:
        recent_tweets = [status_object.text for status_object in excluded_tweets]
        possible_tweets = [tweet for tweet in possible_tweets if tweet not in recent_tweets]

    selected_tweet = random.choice(possible_tweets)

    return selected_tweet
get_tweet returns the text your bot will tweet. Its first parameter, tweets_file, is the path to the csv file where you store the list of predefined tweets. The second one, excluded_tweets, is a list of tweets coming from the Twitter API that you use to avoid tweeting very recent tweets.
Finally, you define the lambda_handler function:
def lambda_handler(event, context):
    print("Get credentials")
    consumer_key = os.getenv("CONSUMER_KEY")
    consumer_secret = os.getenv("CONSUMER_SECRET")
    access_token = os.getenv("ACCESS_TOKEN")
    access_token_secret = os.getenv("ACCESS_TOKEN_SECRET")

    print("Authenticate")
    auth = tweepy.OAuthHandler(consumer_key, consumer_secret)
    auth.set_access_token(access_token, access_token_secret)
    api = tweepy.API(auth)

    print("Get tweet from csv file")
    tweets_file = ROOT / "tweets.csv"
    recent_tweets = api.user_timeline()[:3]
    tweet = get_tweet(tweets_file)

    print(f"Post tweet: {tweet}")
    api.update_status(tweet)

    return {"statusCode": 200, "tweet": tweet}
lambda_handler is executed when the AWS Lambda function is triggered. It gets the Twitter credentials from the environment variables, authenticates your bot using the Twitter API, gets the last 3 tweets, and posts the tweet retrieved by get_tweet.
The rest of the files you don't need to review in a detailed manner. But feel free to take a look at them on your own if you're curious.
Now that everything's set up, you just need to follow this development workflow:
- Define your bot's logic in
lambda_function.py - Test changes by executing
$ python entrypoint.pyfrom the root directory of your project
Once you are happy with your bot's behavior, package the code:
- Add any additional libraries you used to
requirements.txt - Run
sh createlambdalayer.sh 3.8from the root directory of your project. It'll package the libraries inrequirements.txtfor a Python 3.8+ runtime inlayer.zip - Run
sh buildpackage.shfrom the root directory of your project. It'll make a zip file with the code for your Lambda function calledlambda_function.zip
Next, you'll learn how to get your bot into an AWS Lambda function.
Deploy Your Bot as an AWS Lambda Function
Setting up your bot as a Lambda function is straightforward but you must follow the steps in an orderly manner. Let's go through the details.
First, you'll create a Lambda Layer with the libraries used in your bot's code (the layer.zip file you generated earlier). Second, you'll create a Lambda function, upload your bot's code (lambda_function.zip), and add the layer you created. Finally, you'll add a trigger that will execute your Lambda function every day at 10.00 (UTC.)
Let's start by creating a Lambda Layer.
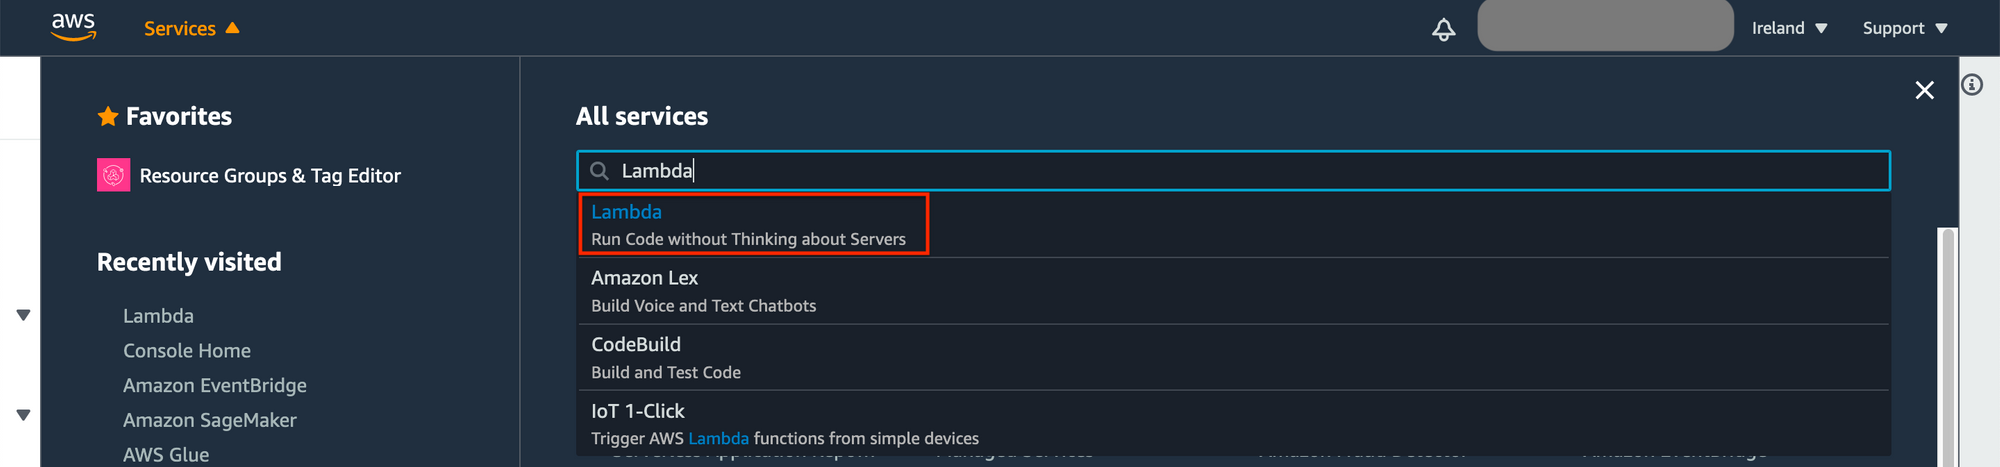
Search for Lambda in the Services dropdown menu. Select the first option (Lambda.)
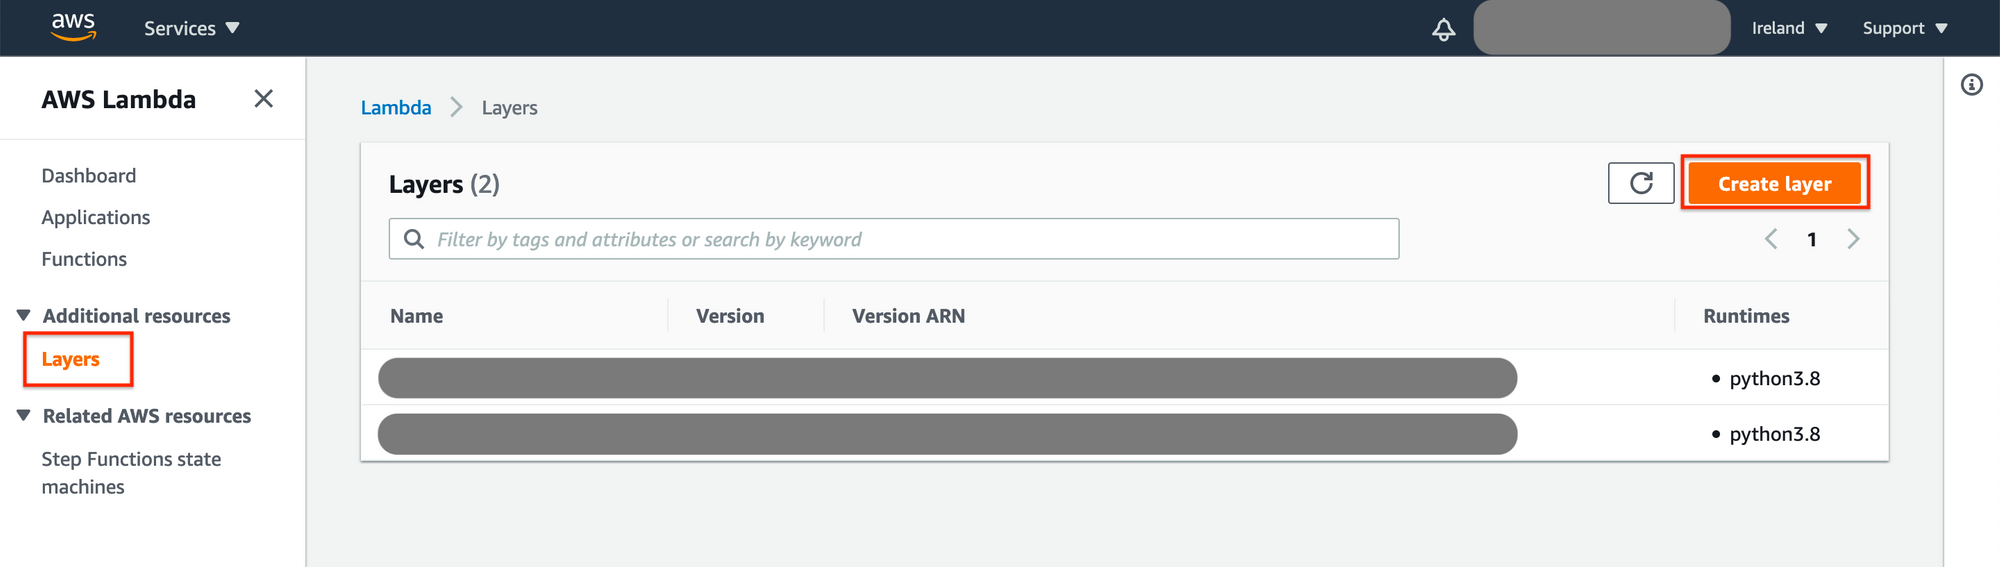
Click on Layer under Additional Resources on the sidebar. Then, select Create layer.
In the Create Layer section, choose a name for your layer, upload the layer.zip file you generated earlier, and select the Python 3.8 runtime.
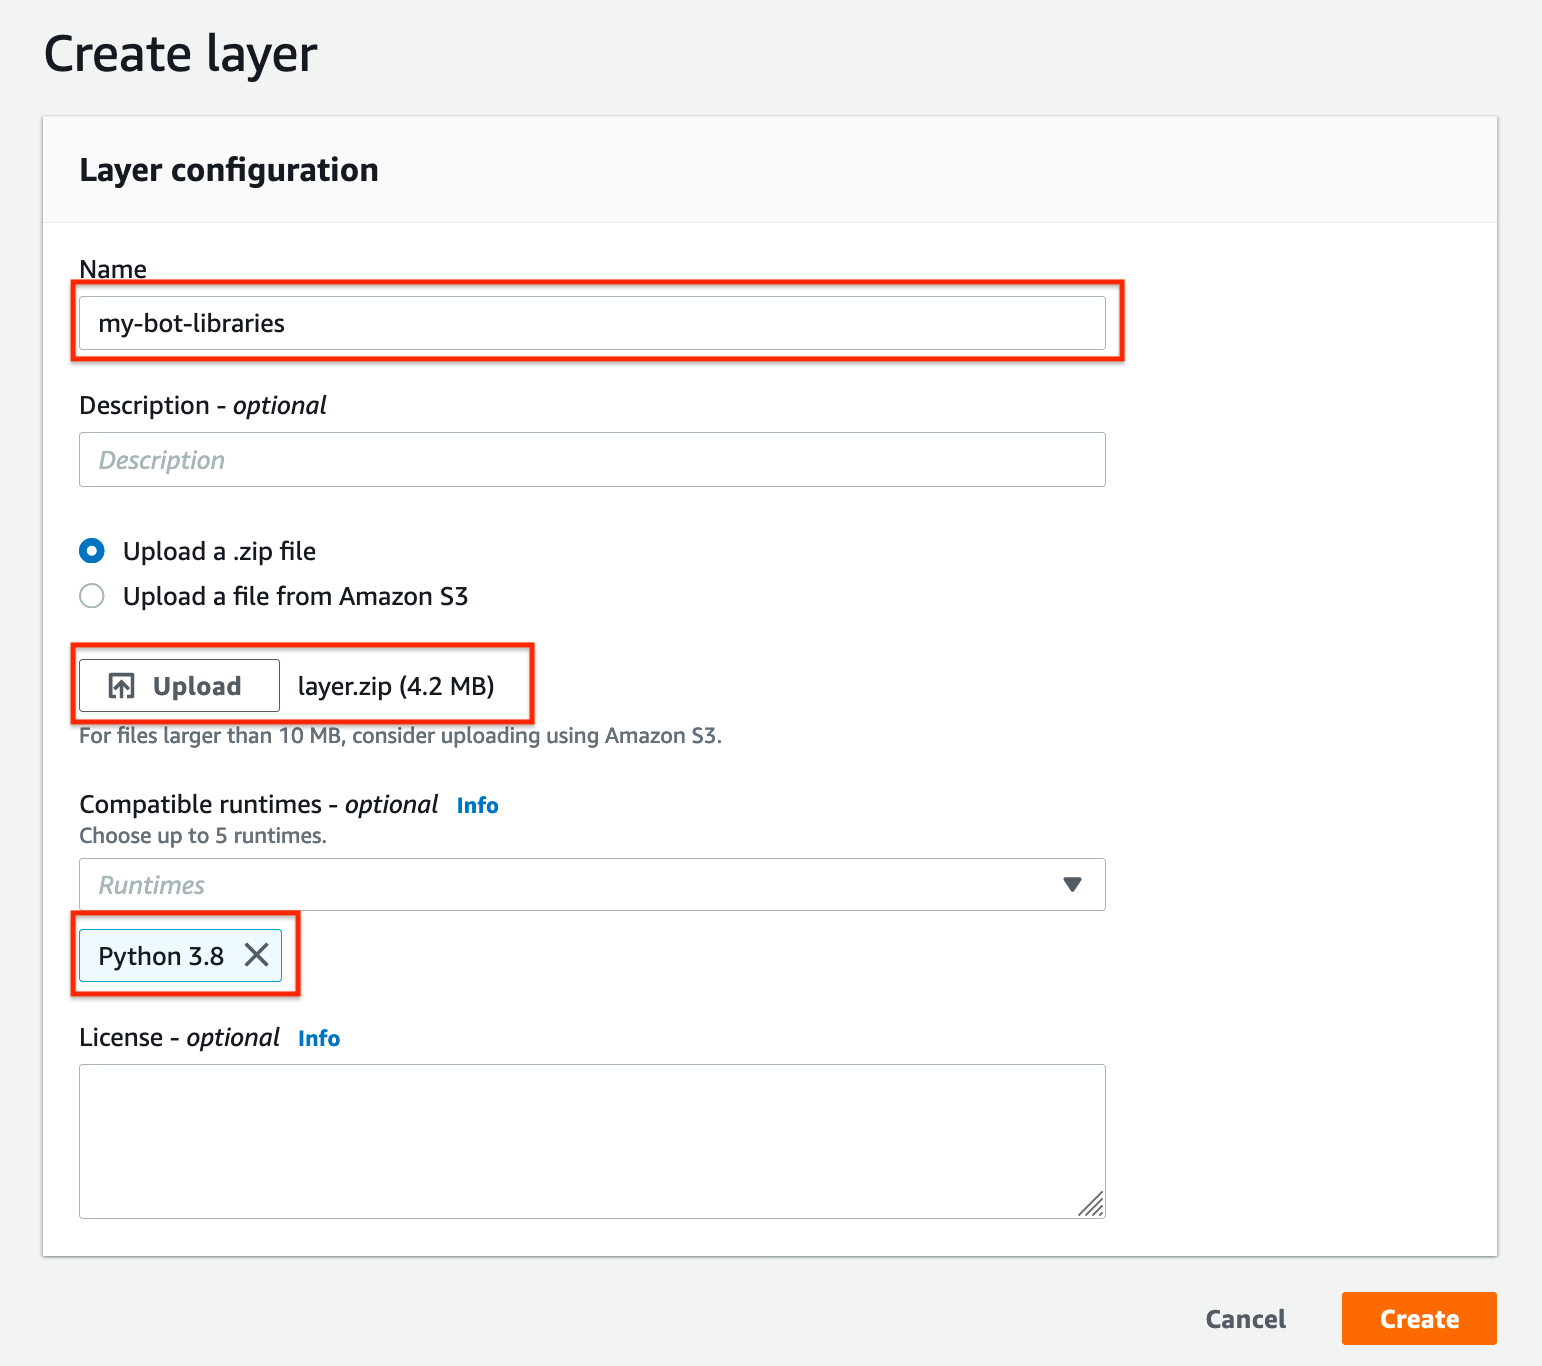
That's all! You just created your Lambda Layer. Not bad, huh?
Next, you'll create a new Lambda function.
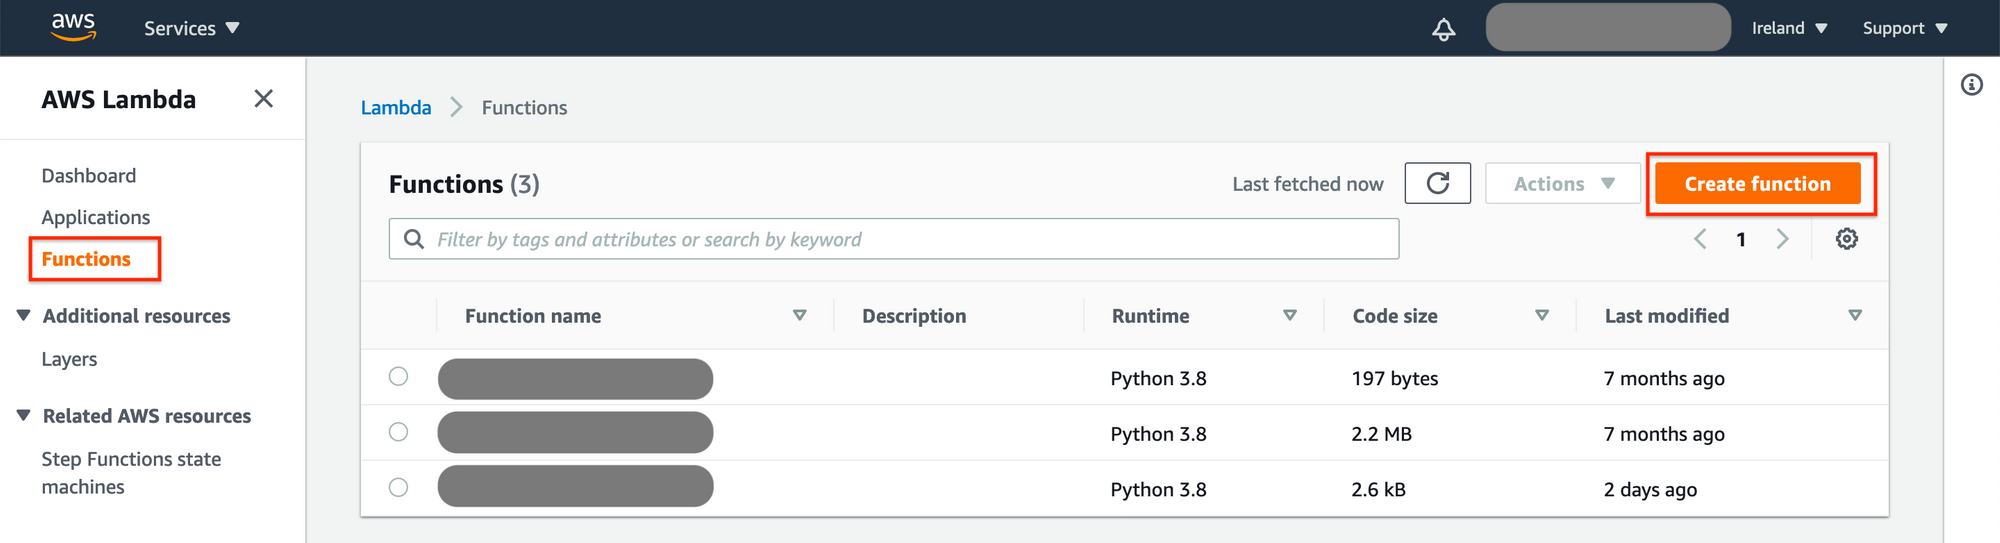
Select Functions on the sidebar. Then, click on Create function.
Next, choose a name for your function, and select the Python 3.8 runtime.
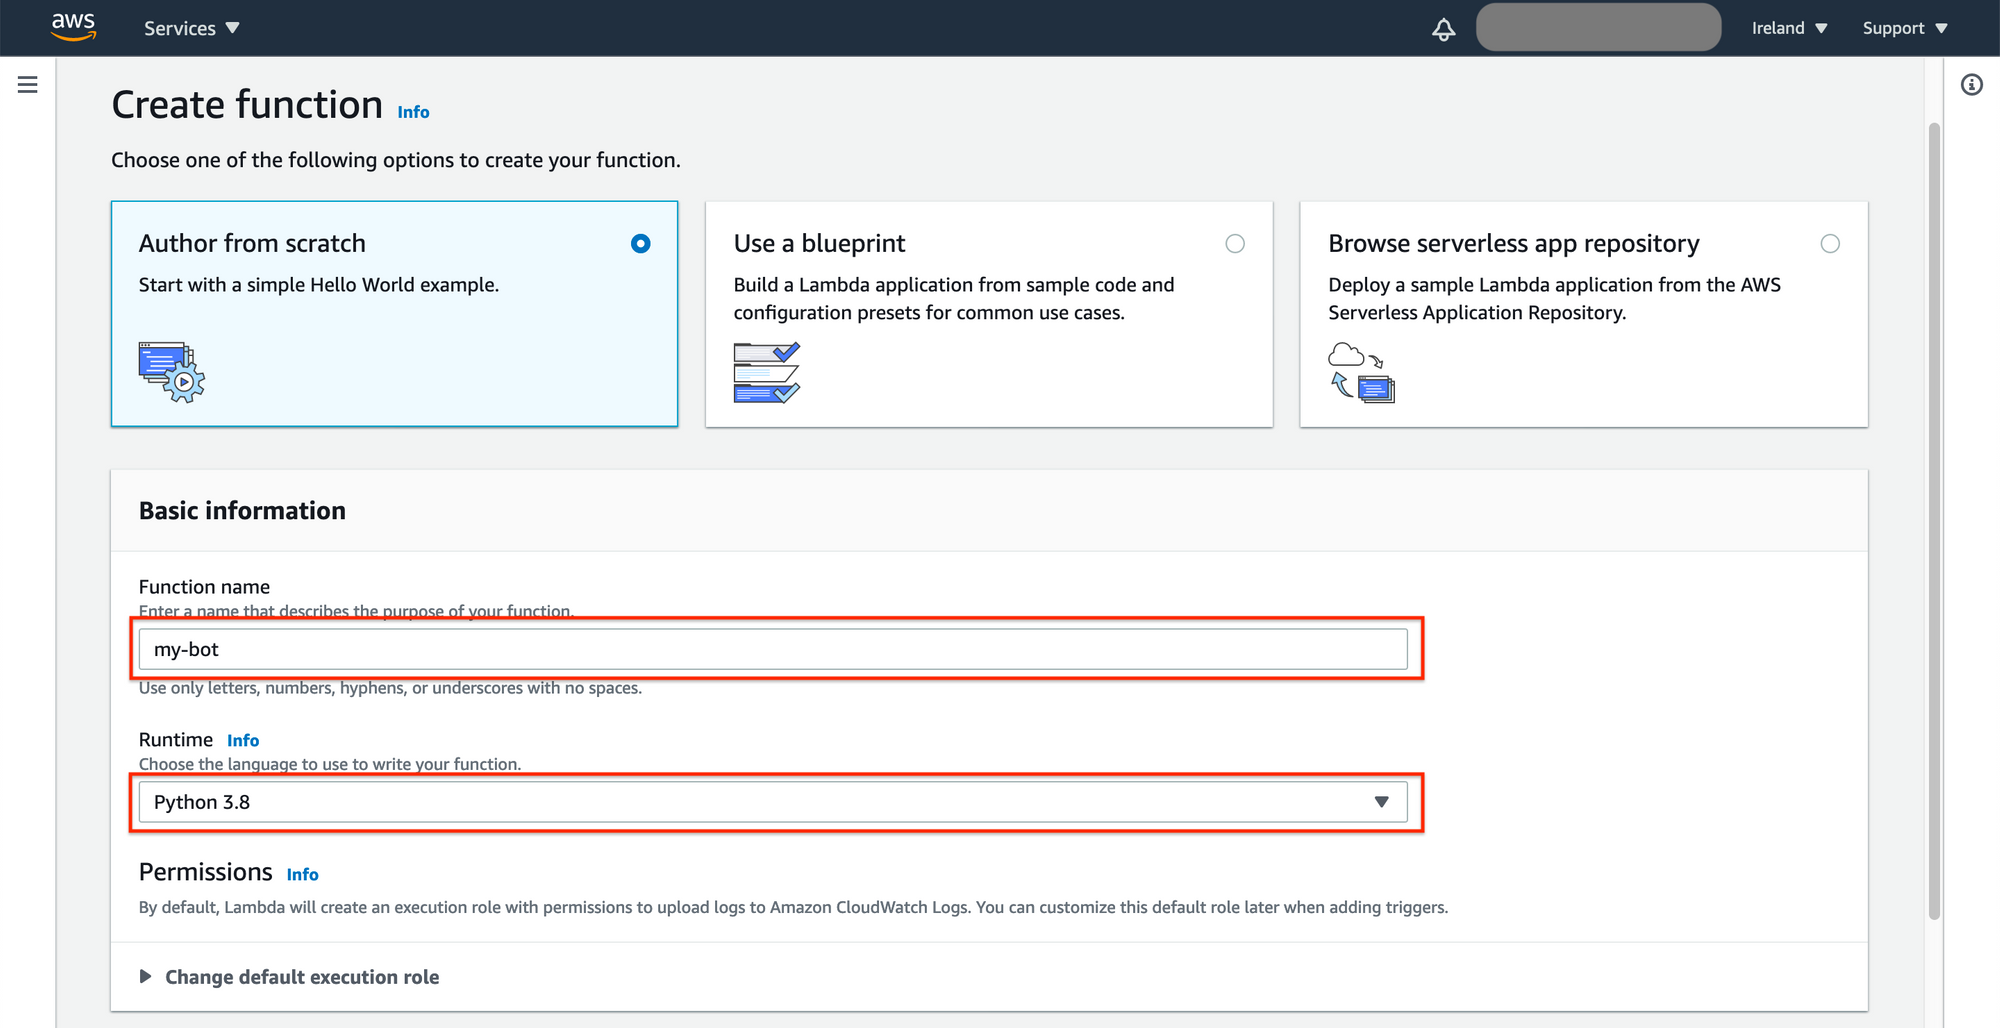
You've got it!
Next, you'll upload your code, add the Lambda Layer to your function, and define a scheduled trigger for it.
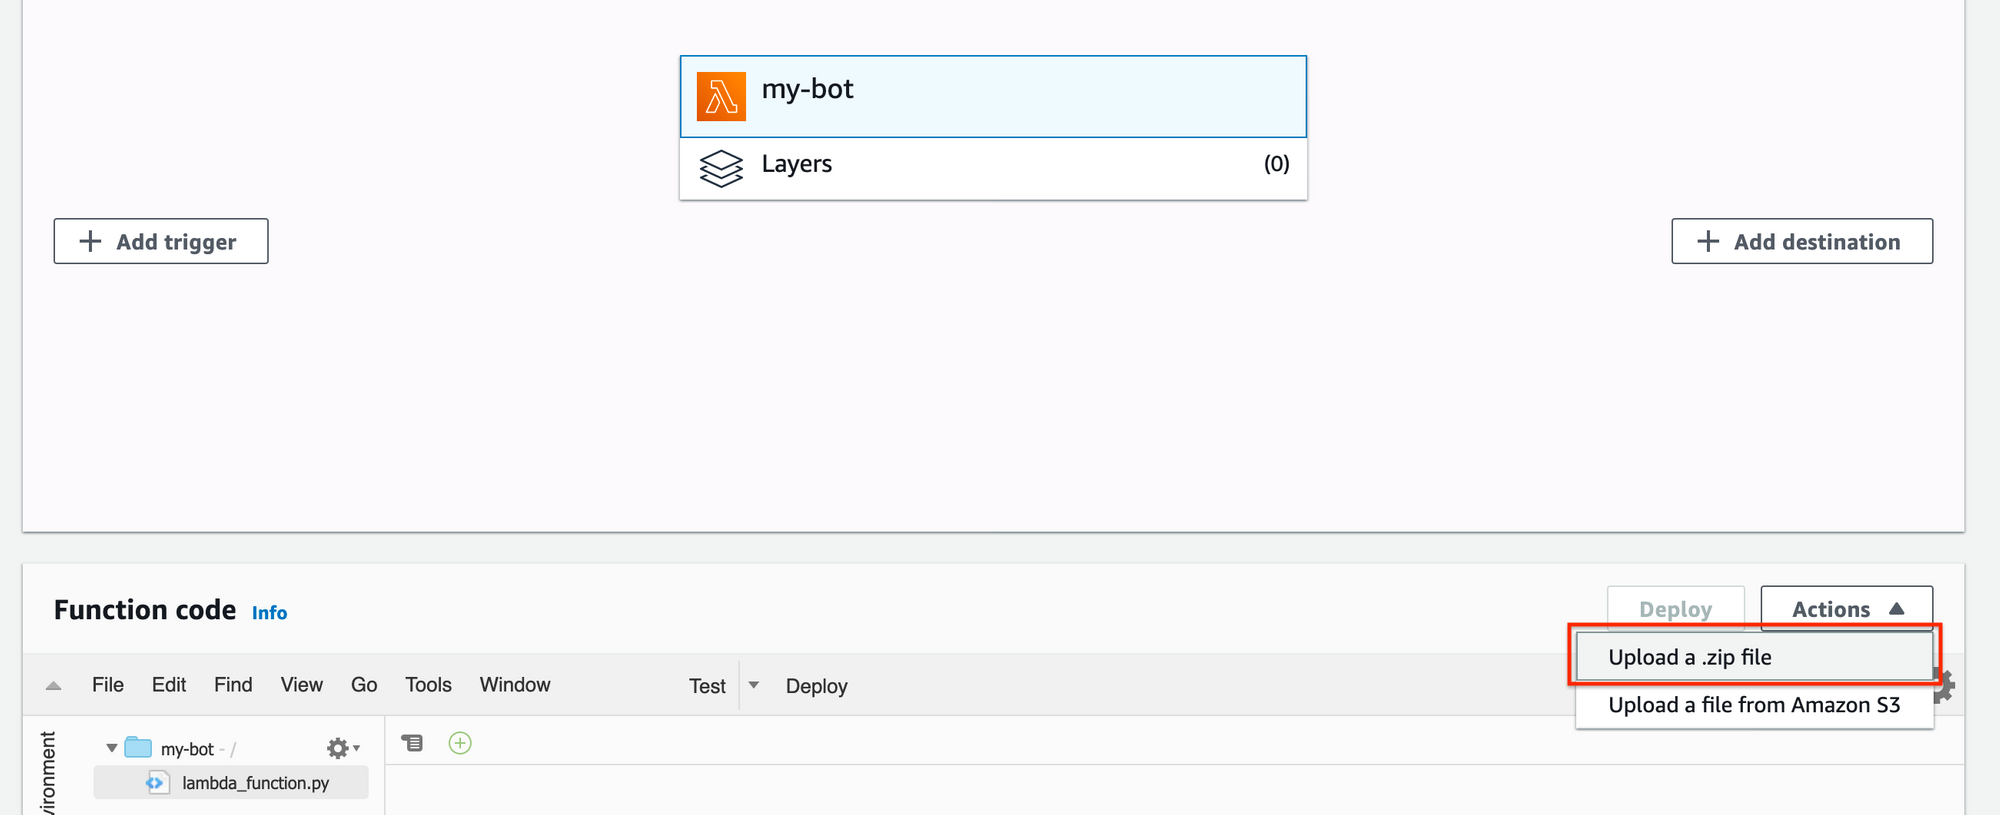
To upload the code, go to Function code area, click on Action, and select Upload a .zip file. Upload lambda_function.zip and save your changes.
In addition to your code, you'll need to add the Twitter API Keys as environment variables. Go to Environment variables, click on Edit, and add the variables as key-value pairs:
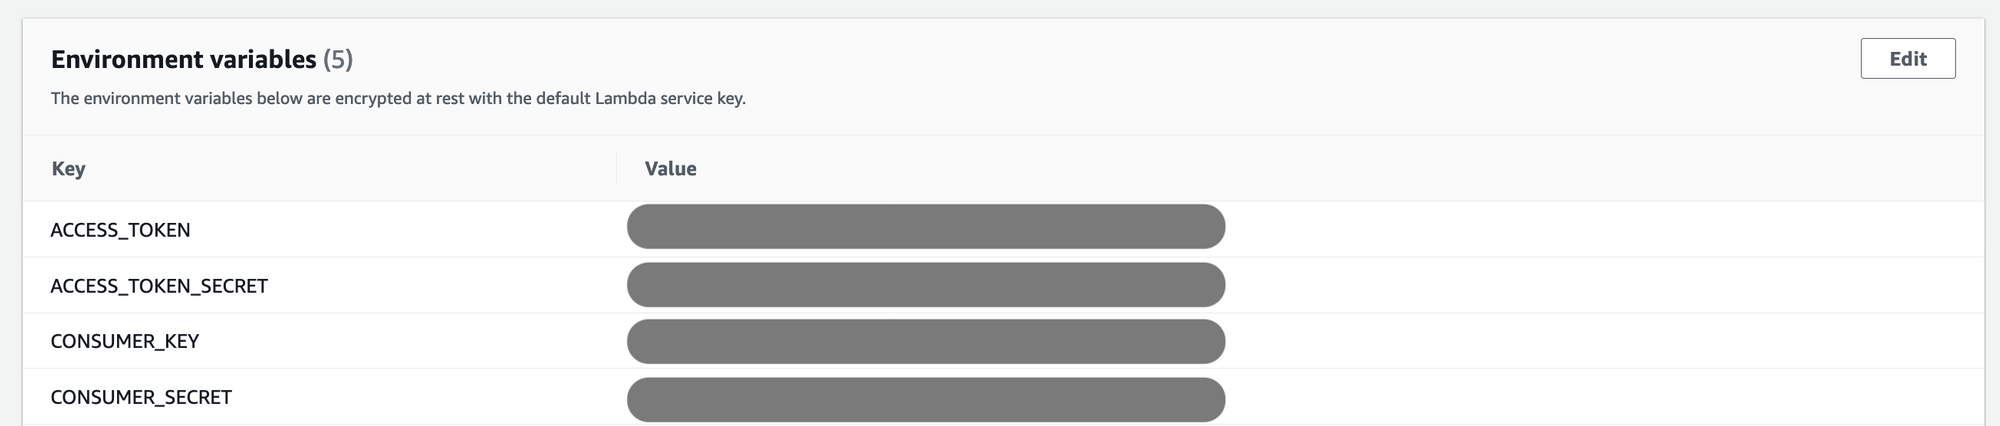
Next, you'll add a Lambda Layer to your function.
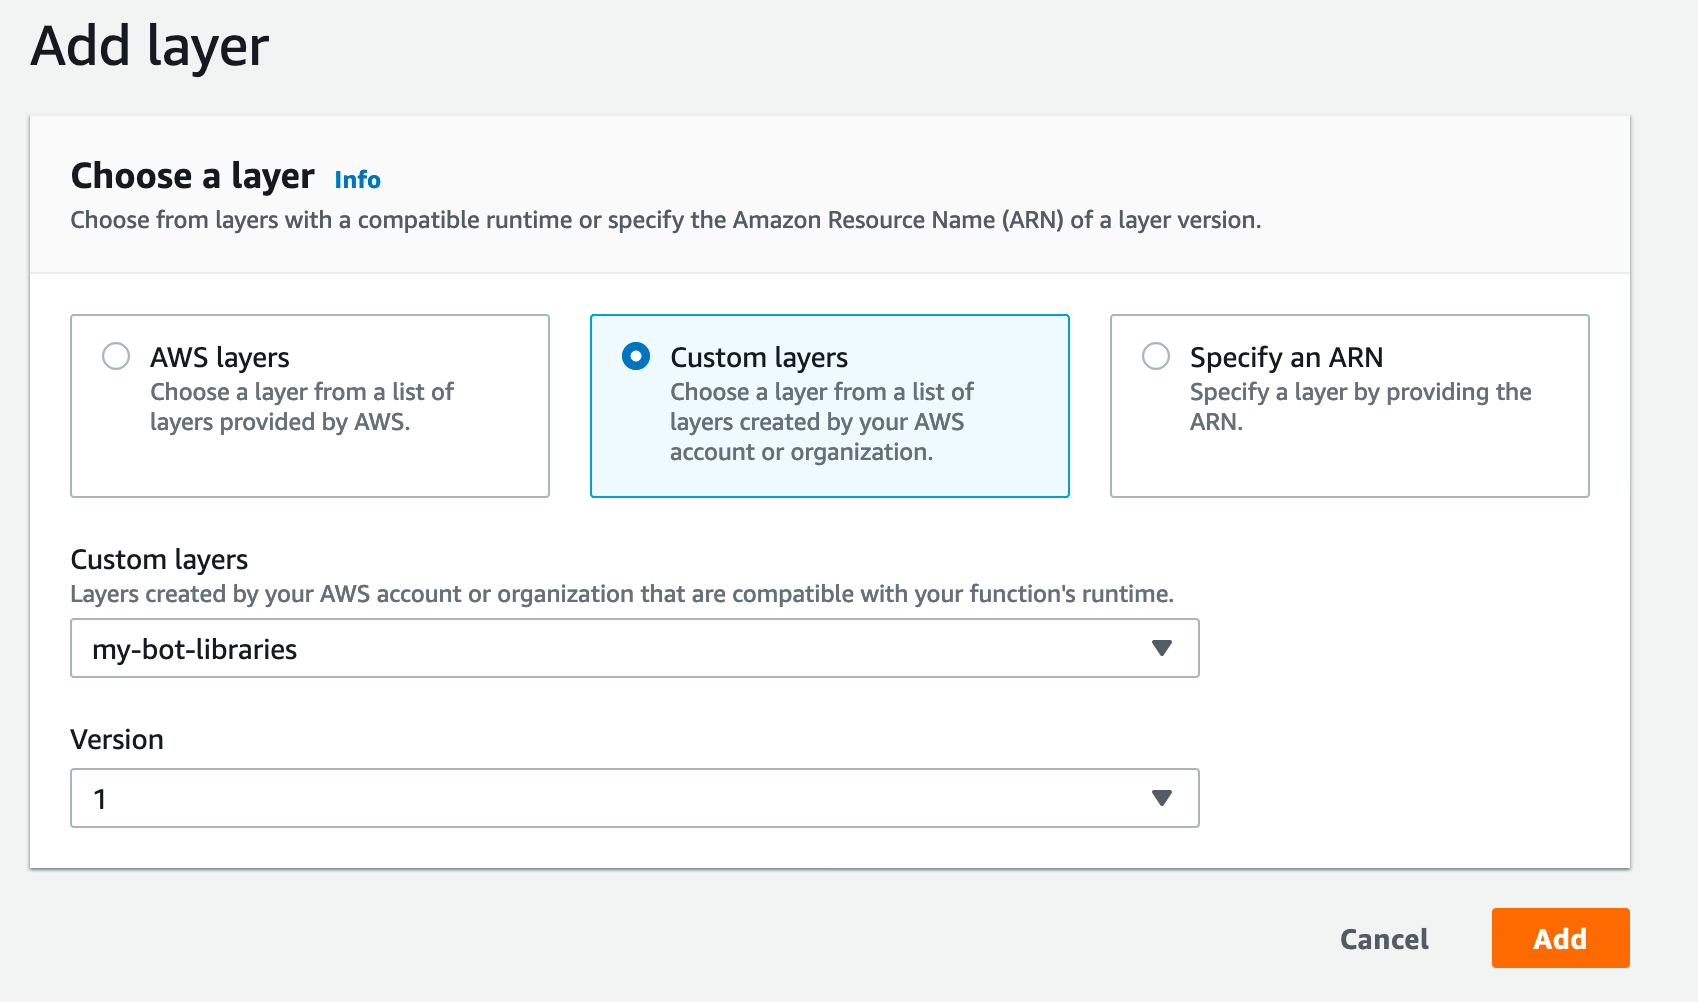
Select Layers and click on Add a layer.
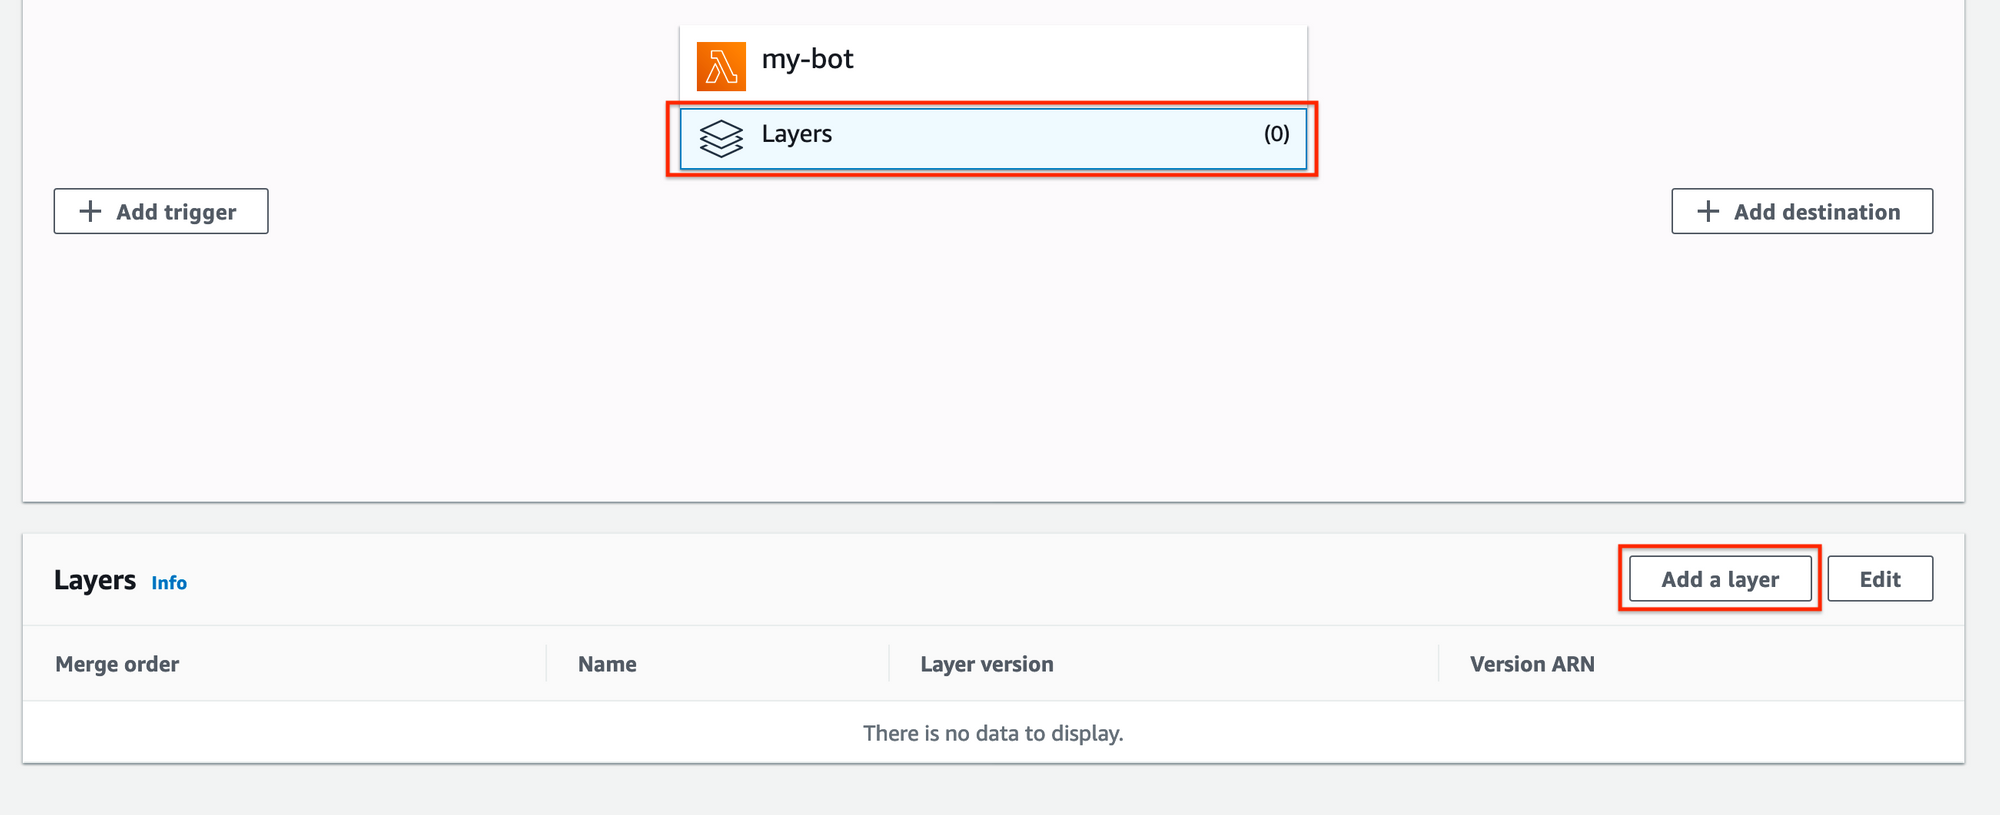
On the next screen, select Custom layers and find the layer you created. Then click on Add.
By now, you uploaded the code, set your environment variables, and added the layer. You're only missing the trigger that will execute your function.
To add the rigger start by selecting the Add trigger option.

In the next screen, fill the required fields as follows:

This trigger will execute your Lambda function every day at 10.00 (UTC.) If you'd like to add a different trigger, take a look at the Schedule Expressions documentation.
Finally, the only thing left is testing your Lambda function. Do it by clicking on the Test button. It'll ask you to configure a Test Event, which you can keep with the default values.

If everything went well, after you test your function, you'd see a green banner with an Execution result: succeeded message. Otherwise, go back to the previous steps and make sure that you set up everything correctly. You can also leave a comment, and I'll try to help you out.
Conclusion
Well done! Your Twitter bot is alive and kicking, or rather, tweeting ;)
You went through the end-to-end process of developing and deploying a Twitter bot. It was a long road where you created and configured a Twitter app, develop your bot’s logic in your local machine, and created and configured an AWS Lambda function to deploy your bot.
In this tutorial, you've learned:
- What Twitter bots are and which actions they can and cannot do
- What options you have to make Twitter bot
- How to develop a bot in your local machine using Python
- How to deploy your bot as a serverless function using AWS Lambda functions
If you found this useful, please show some love on Twitter.