from datasets import load_dataset
from dotenv import load_dotenv
from langchain_core.messages import HumanMessage, SystemMessage
from langchain_openai import ChatOpenAI
from langsmith import Client, trace, traceable
from langsmith.run_trees import RunTree
from langsmith.wrappers import wrap_openai
from openai import OpenAI
from pydantic import BaseModel, Field

load_dotenv()LangSmith 101
llm
python
openai
langsmith
In my first AI projects, I didn’t have access to proper observability tools and didn’t know how to evaluate the performance of LLM pipelines. I struggled to figure out what to improve and even when I knew what to improve, it was hard to do so, without breaking other things. Many of those projects failed miserably.
Those failed projects made me start looking for better ways and tools to build AI applications. Over time, tools such as LangSmith, Langfuse, or Logfire became key components of my AI toolkit. I can no longer imagine building an AI application without them.
In this tutorial, I’ll walk you through the basics of using LangSmith to monitor and evaluate your LLM applications.
Prerequisites
To complete this tutorial, you need to:
- Sign up and generate OpenAI and LangSmith API keys.
- Create a
.envfile in the root directory of your project and add the following lines:
- Create a virtual environment in Python and install the following packages:
I’m assuming you’re familiar with the basics of LLMs. If you need a refresher, you can check out some of my older posts. Also, if you don’t want to copy and paste the code, you can download this post’s notebook and follow along.
Let’s go!
Setup
As usual, you should start by importing the necessary libraries:
This will import all the libraries required for the next sections:
datasetsfor loading the sample dataset we’ll use to run evaluations.langchainlibraries andopenaifor working with LLMslangsmithfor tracing and evaluating the pipelinedotenvandpydanticfor environment variable management and data validation
Next, you will create your first trace on LangSmith.
Tracing and monitoring
A LangSmith trace captures the full execution path of a single operation. It consists of a sequence of steps, which are called runs. Each trace contains the top-level inputs and outputs, as well as metadata such as runtime version and operating system details.
There are four ways to create traces in LangSmith:
- Using
@traceable - Using a wrapped client
- Using a
tracecontext manager - Manually creating traces with
RunTree
Using @traceable
The simplest way is to encapsulate your pipeline in a function and use the traceable decorator:
client = OpenAI()


@traceable
def format_messages(question: str) -> list[dict]:
    return [
        {"role": "system", "content": "You're a helpful assistant"},
        {"role": "user", "content": question},
    ]


@traceable(run_type="llm")
def call_llm(messages: list[dict]):
    response = client.chat.completions.create(model="gpt-4.1-mini", messages=messages)
    return response


@traceable
def run_pipeline(question: str):
    messages = format_messages(question)
    response = call_llm(messages)
    return response.choices[0].message.content


run_pipeline("Who are you?")
This will automatically log the input and ouput of the functions decorated with traceable. It will also handle the nesting for you, so that format_messages and call_llm are steps within the run_pipeline function.
In traceable you can customize xyz.
Using a trace context manager
In addition, to the traceable decorator, you can also use the trace context manager to create traces. You can easily combine both as shown below:
client = OpenAI()


@traceable
def format_messages(question: str) -> list[dict]:
    return [
        {"role": "system", "content": "You're a helpful assistant"},
        {"role": "user", "content": question},
    ]


@traceable(run_type="llm")
def call_llm(messages: list[dict]):
    response = client.chat.completions.create(model="gpt-4.1-mini", messages=messages)
    return response


app_inputs = {"question": "Who are you?"}

with trace("run_pipeline", inputs=app_inputs) as rt:
    messages = format_messages(app_inputs["question"])
    response = call_llm(messages)
    output = response.choices[0].message.content
    rt.end(outputs={"output": output})
This will generate a trace called “LLM Pipeline” with the input and output of the entire pipeline. Within this trace, you will find the individual traces for each function call.
Using a wrapped client
For OpenAI and Anthropic models, LangSmith offers a wrapped client that automatically instruments calls to the API with tracing. Any call to the LLM will automatically handled by LangSmith. This plays well with using traceable for the rest of the part in your pipeline. For example:
client = wrap_openai(OpenAI())  # Added client wrapper


@traceable
def format_messages(question: str) -> list[dict]:
    return [
        {"role": "system", "content": "You're a helpful assistant"},
        {"role": "user", "content": question},
    ]


# Removed @traceable
def call_llm(messages: list[dict]):
    response = client.chat.completions.create(model="gpt-4.1-mini", messages=messages)
    return response


@traceable
def run_pipeline(question: str):
    messages = format_messages(question)
    response = call_llm(messages)
    return response.choices[0].message.content


run_pipeline("Who are you?")
This will automatically log the LLM calls made within run_pipeline, so you no longer need to add the traceable decorator to each call.
Manually creating traces with RunTree
If you want to have more control over the tracing, you can use RunTree. It provides the most flexibility but requires more setup.
Here’s the RunTree version of the previous example:
client = OpenAI()


def format_messages(question: str, parent_run: RunTree):
    format_message_step = parent_run.create_child(
        name="format_messages", run_type="tool", inputs={"question": question}
    )
    format_message_step.post()
    messages = [
        {"role": "system", "content": "You are a helpful assistant."},
        {"role": "user", "content": question},
    ]
    format_message_step.end(outputs={"messages": messages})
    format_message_step.patch()
    return messages


def call_llm(messages: list[dict], parent_run: RunTree):
    call_llm_step = parent_run.create_child(
        name="call_llm",
        run_type="llm",
        inputs={"messages": messages},
    )
    call_llm_step.post()
    response = client.chat.completions.create(model="gpt-4.1-mini", messages=messages)
    call_llm_step.end(outputs=response)
    call_llm_step.patch()
    return response


def run_pipeline(question: str):
    parent_run = RunTree(name="run_pipeline", inputs={"question": question})
    parent_run.post()

    messages = format_messages(question, parent_run)
    response = call_llm(messages, parent_run)

    parent_run.end(outputs={"answer": response.choices[0].message.content})
    parent_run.patch()


run_pipeline("Who are you?")
This will result in a similar trace, but in this case you have more control over when/what to send in each step.
For all of these methods, you should’ve obtained a trace that looks like this:
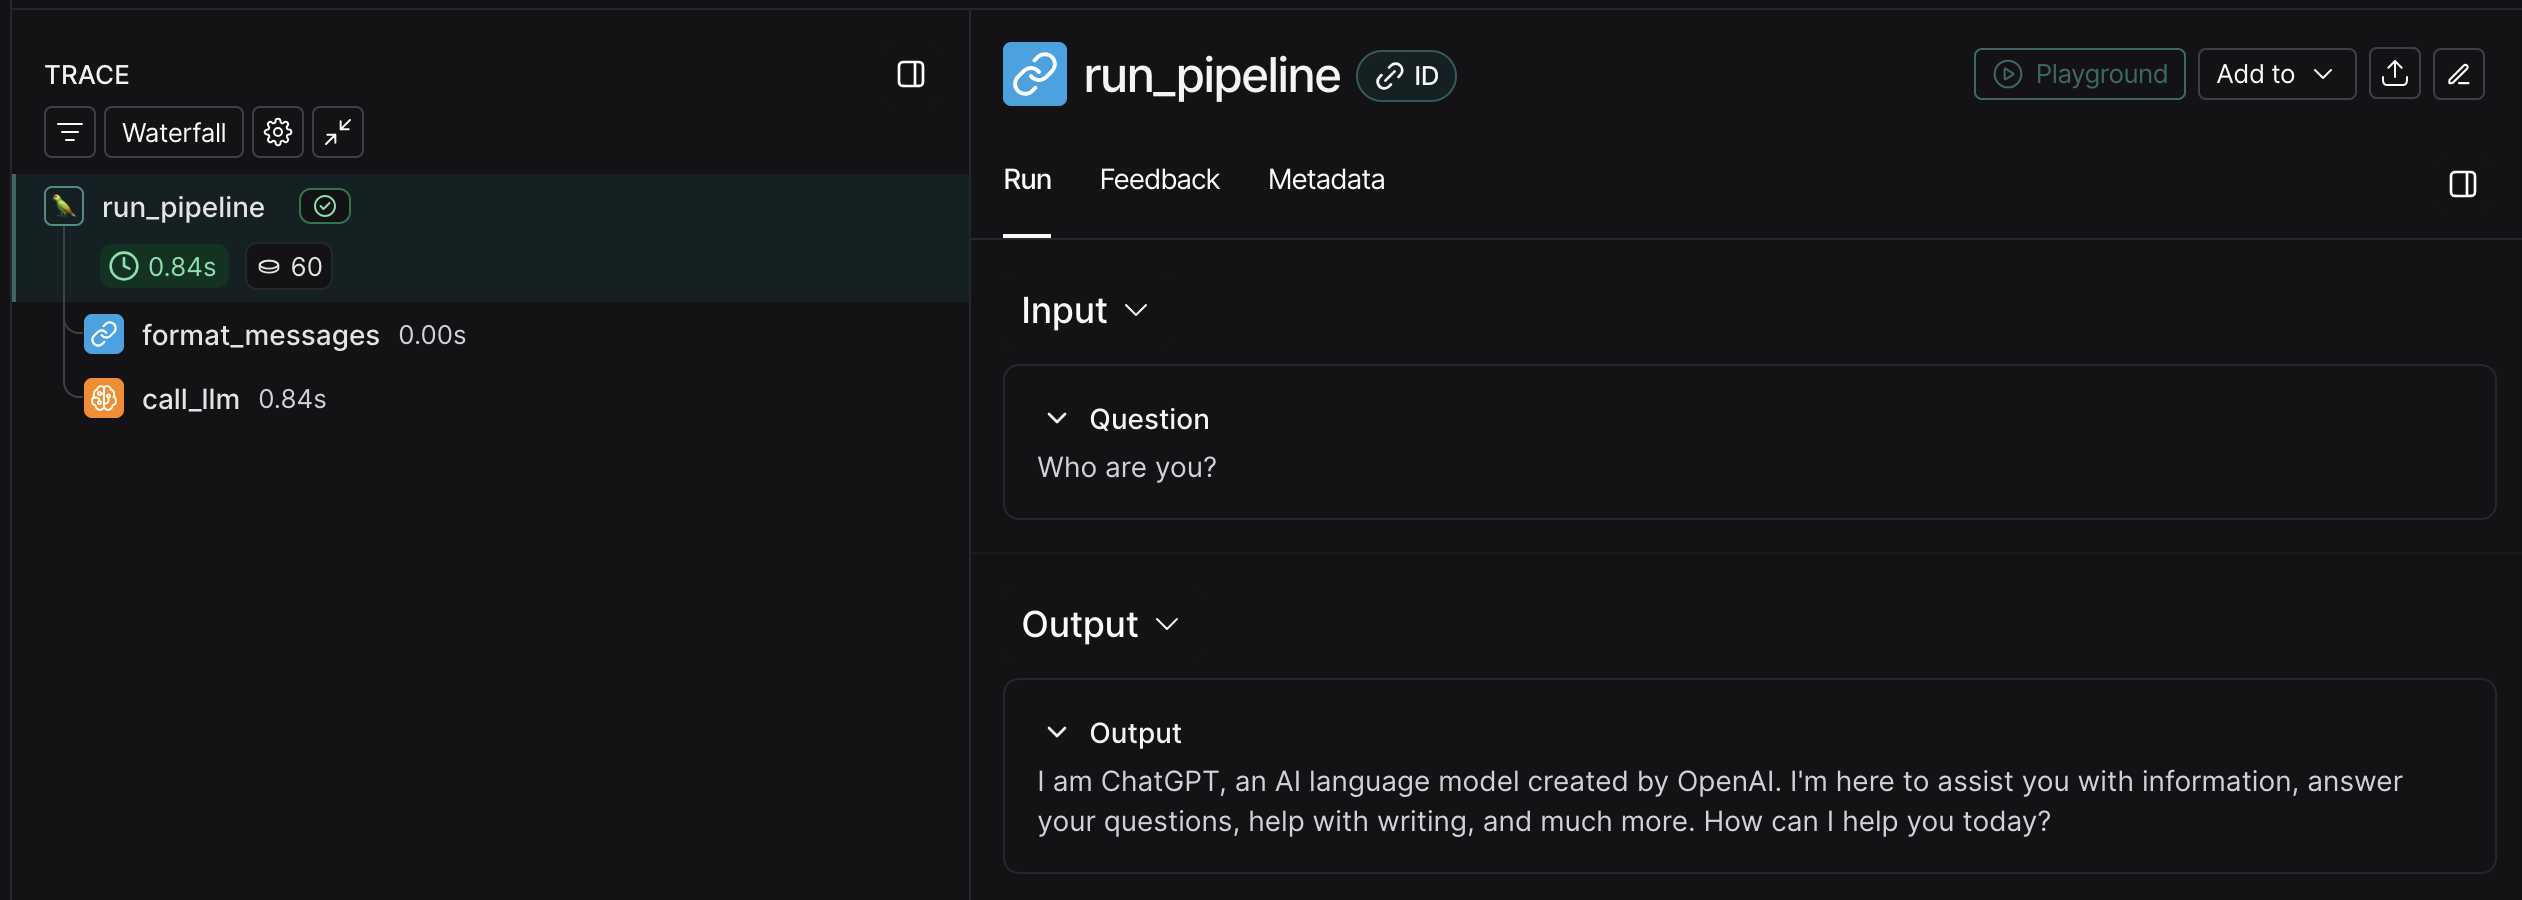
To the left of the image, you should see the trace for the run_pipeline function, which includes all the steps taken during the execution of the function, including the formatting of messages and the call to the LLM. To the right, you will see the input and output for the full trace.
Then, you can click on each individual step to view more details about that step, including the inputs, outputs, and any errors that may have occurred.
Here’s format_messages:

And here’s call_llm:

I recommend you explore the traces on your own. Just looking at the images in this post won’t be enough.
Evaluation
LangSmith lets you evaluate your LLM pipelines by providing you with a way to upload evaluation datasets, define evaluation metrics, and view the results of your experiments.
Let’s explore this by running a set of evals on a sample dataset. You’ll use the AIMO Validation AIME dataset that contains questions, answers and detailed solutions from the 2022, 2023, and 2024 AIME competitions.
You should start by creating a dataset on LangSmith:
ds = load_dataset("AI-MO/aimo-validation-aime")
examples = [
{"inputs": {"question": d["problem"]}, "outputs": {"answer": int(d["answer"])}}
for d in ds["train"]
][:15]
client = Client()
dataset_name = "AIME Example Dataset (sample)"
try:
dataset = client.create_dataset(dataset_name)
client.create_examples(dataset_id=dataset.id, examples=examples)
except Exception as e:
print(f"Dataset {dataset_name} already exists. Error: {e}")
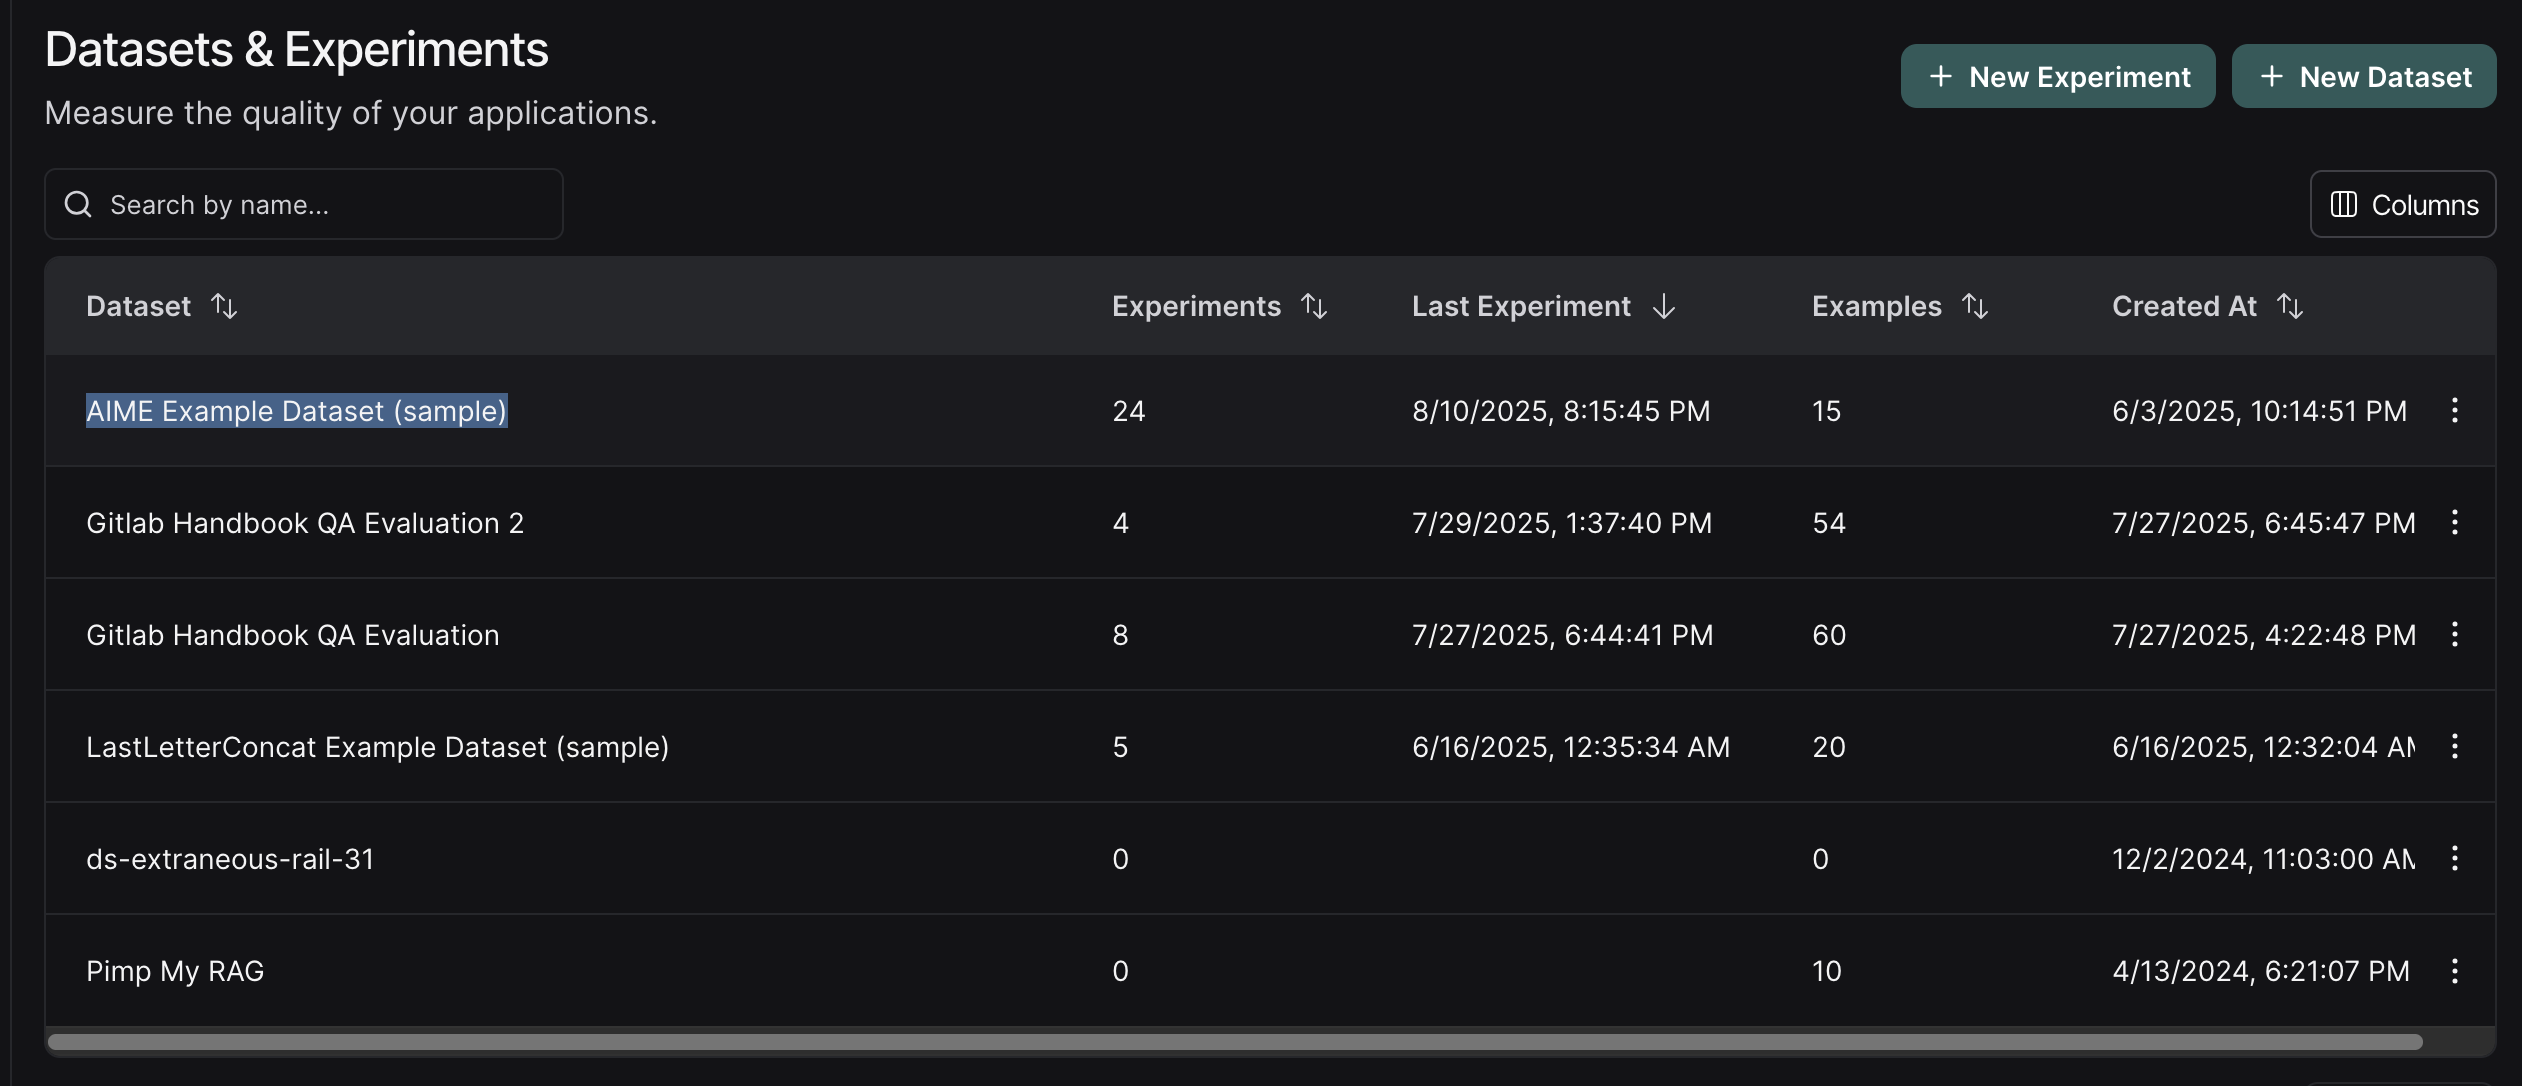
passDataset AIME Example Dataset (sample) already exists. Error: Conflict for /datasets. HTTPError('409 Client Error: Conflict for url: https://api.smith.langchain.com/datasets', '{"detail":"Dataset with this name already exists."}')This will create a dataset with the first 15 examples from the AIMO Validation AIME dataset. I only included a a sample of the dataset to keep costs down. You can always add more examples later if needed.
The dataset will be available under Datasets & Experiments:
Then, you’ll define a pipeline that takes the user question, and provides a response using a structured output:
class Response(BaseModel):
    explanation: str = Field(description="The explanation of the answer")
    answer: int = Field(
        description="The answer to the question. It should be an integer."
    )


model = ChatOpenAI(model="gpt-4.1-mini", temperature=0)
model_with_structure = model.with_structured_output(Response, method="function_calling")


def get_response(question: str) -> Response:
    max_retries = 3
    for _ in range(max_retries):
        try:
            messages = [
                SystemMessage(
                    "You're a math expert. You will always respond in a JSON format with the following fields: explanation and answer."
                ),
                HumanMessage(question),
            ]
            response = model_with_structure.invoke(messages)
            return response
        except Exception as e:
            print(f"Error: {e}")
            continue
    raise ValueError("Failed to get a valid response")
I included a simple retry mechanism, as I often found that the model sometime failed to generate a valid response.
Next, you should define the evaluation metrics you’ll use to measure the performance of your pipeline. You could define a simple accuracy metric that checks if the answer is the same as the expected answer:
To define an evaluation metric in LangSmith, you must create a function that takes the inputs, outputs, and reference outputs as arguments and returns a boolean or a numeric value.
For accuracy, the function checks if the answer provided by the model matches the expected answer from the dataset, and returns a boolean value indicating whether the evaluation passed or failed.
You can also define more complex metrics, such as an LLM judge to evaluate the clarity of the solution:
class ClarityResponse(BaseModel):
    explanation: str = Field(description="The explanation of the answer")
    clarity: int = Field(description="The clarity of the explanation", ge=1, le=5)


def clarity(inputs: dict, outputs: dict, reference_outputs: dict) -> int:
    messages = [
        SystemMessage(
            content="You are a helpful assistant that evaluates the clarity of the explanation of the answer. You will always return a number between 1 and 5, where 1 is the lowest clarity and 5 is the highest clarity."
        ),
        HumanMessage(content=f"Explanation: {outputs['explanation']}"),
    ]
    model_with_clarity_structure = model.with_structured_output(ClarityResponse)
    response = model_with_clarity_structure.invoke(messages)
    return response.clarity
This clarity metric evaluates the clarity of the explanation provided by the model. It uses a scale from 1 to 5, where 1 indicates low clarity and 5 indicates high clarity.
Finally, you can run the evaluation using client.evaluate():
LangSmith requires you to define a function that wraps your pipeline function. It should take an input dictionary that contains the necessary parameters for your pipeline and return a dictionary with the results. You can also specify a evaluators parameter that includes the evaluation metrics you want to use.
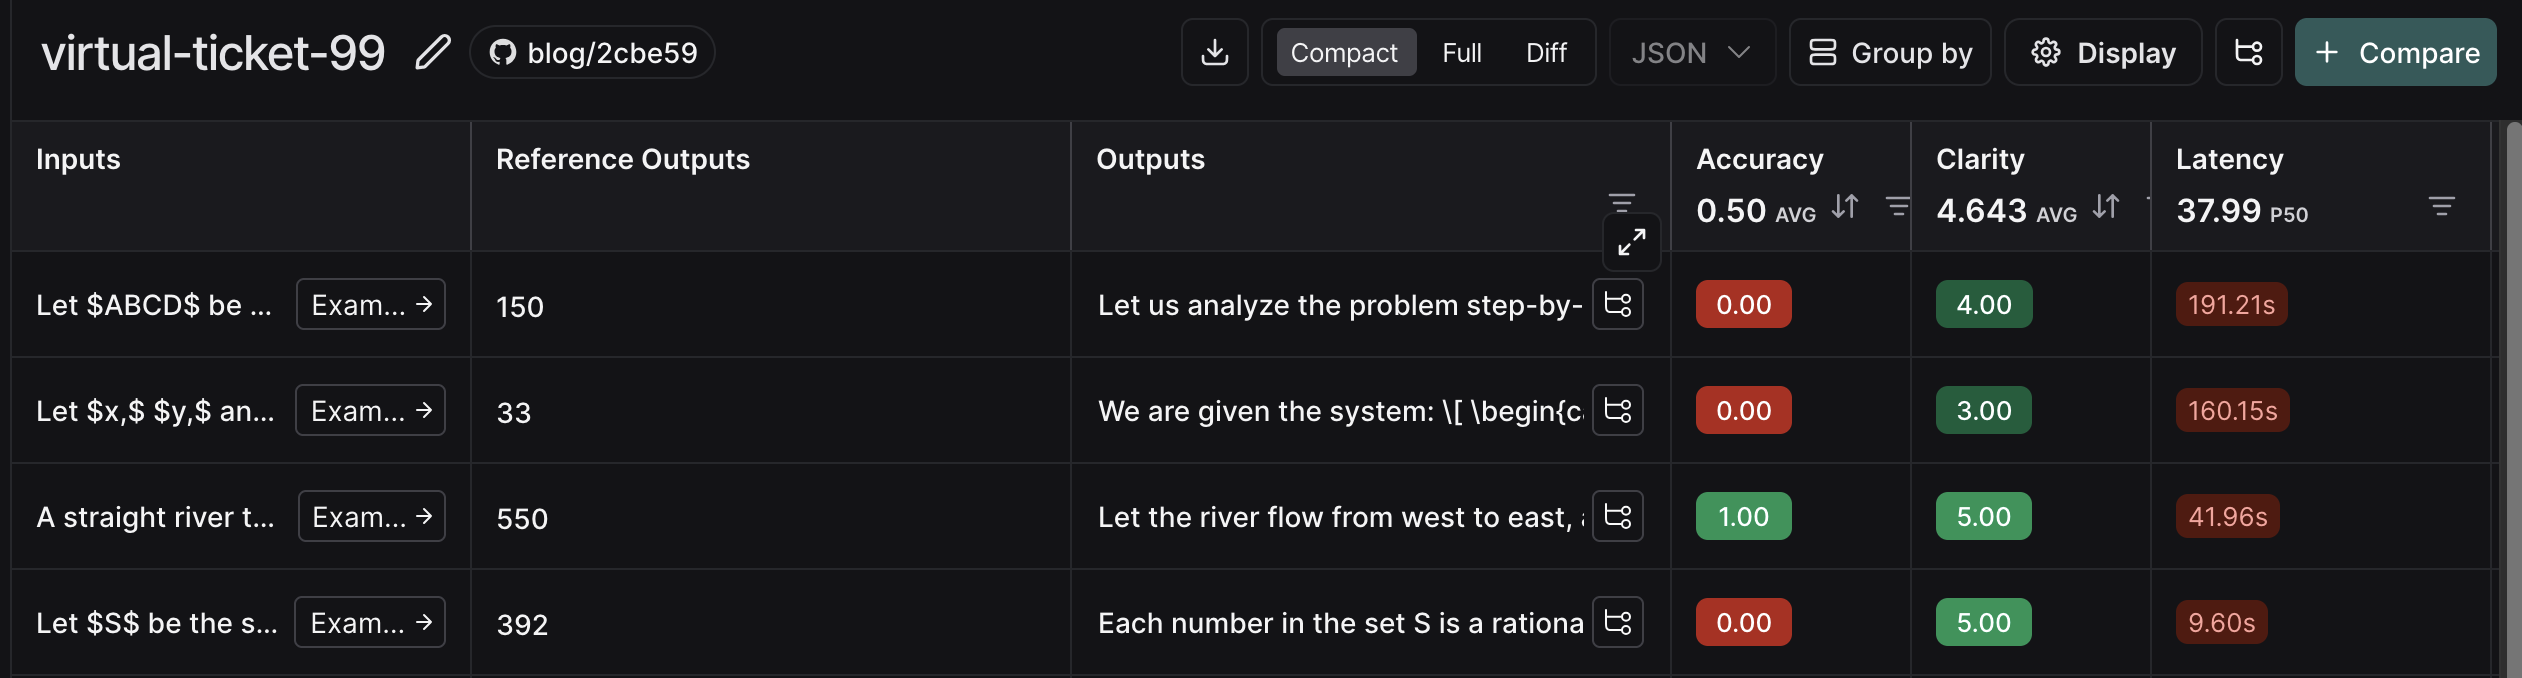
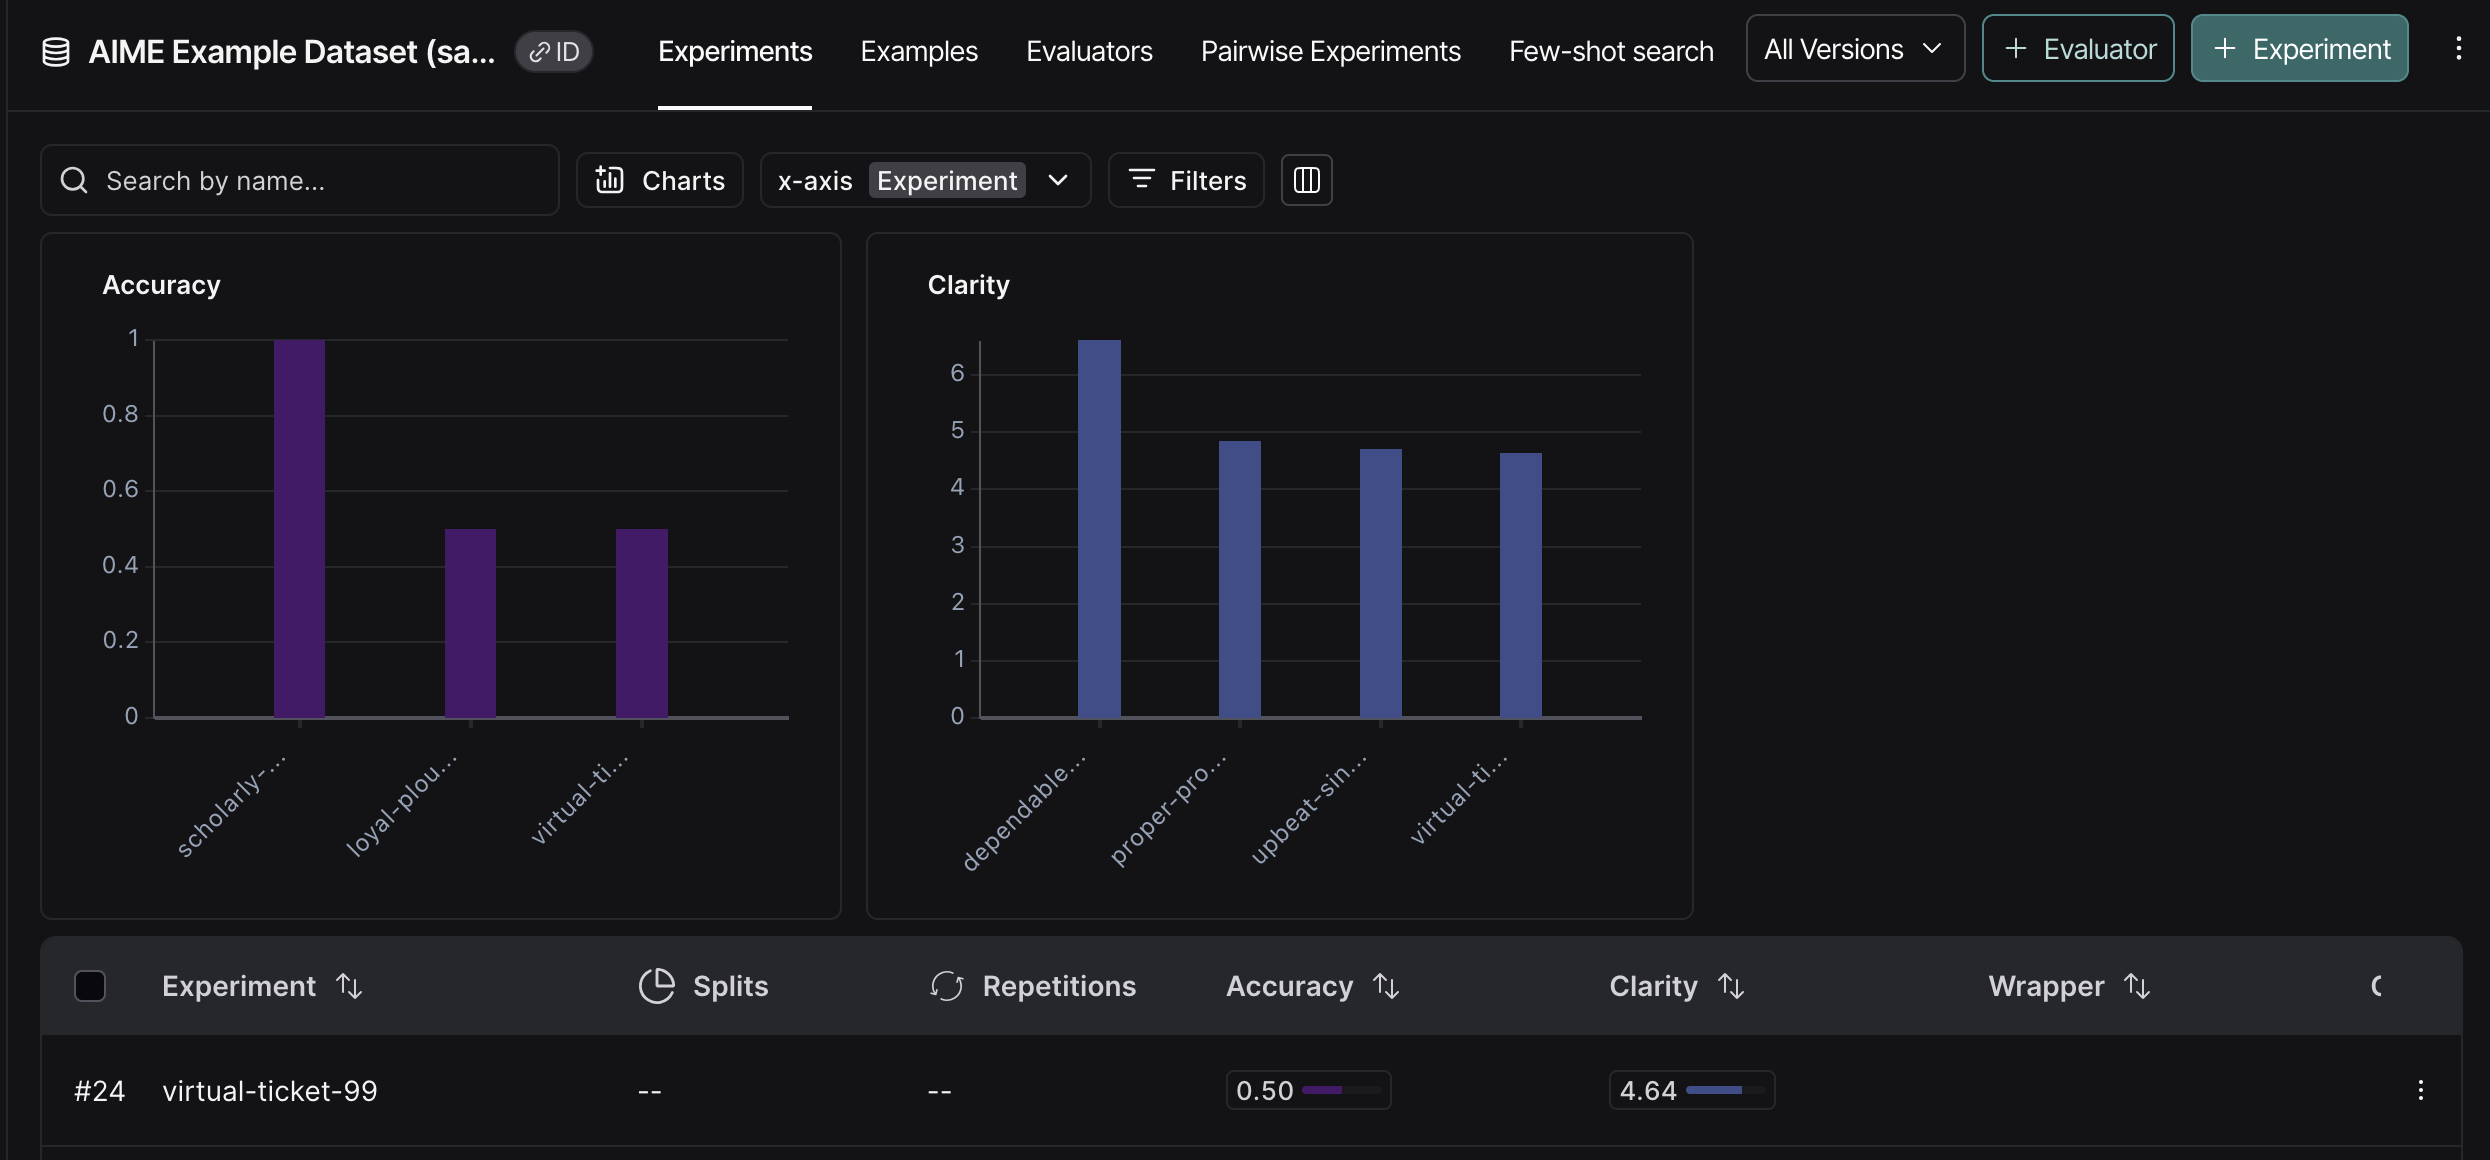
After you’ve run the evaluation, you’ll be able to inspect the results of the experiment:
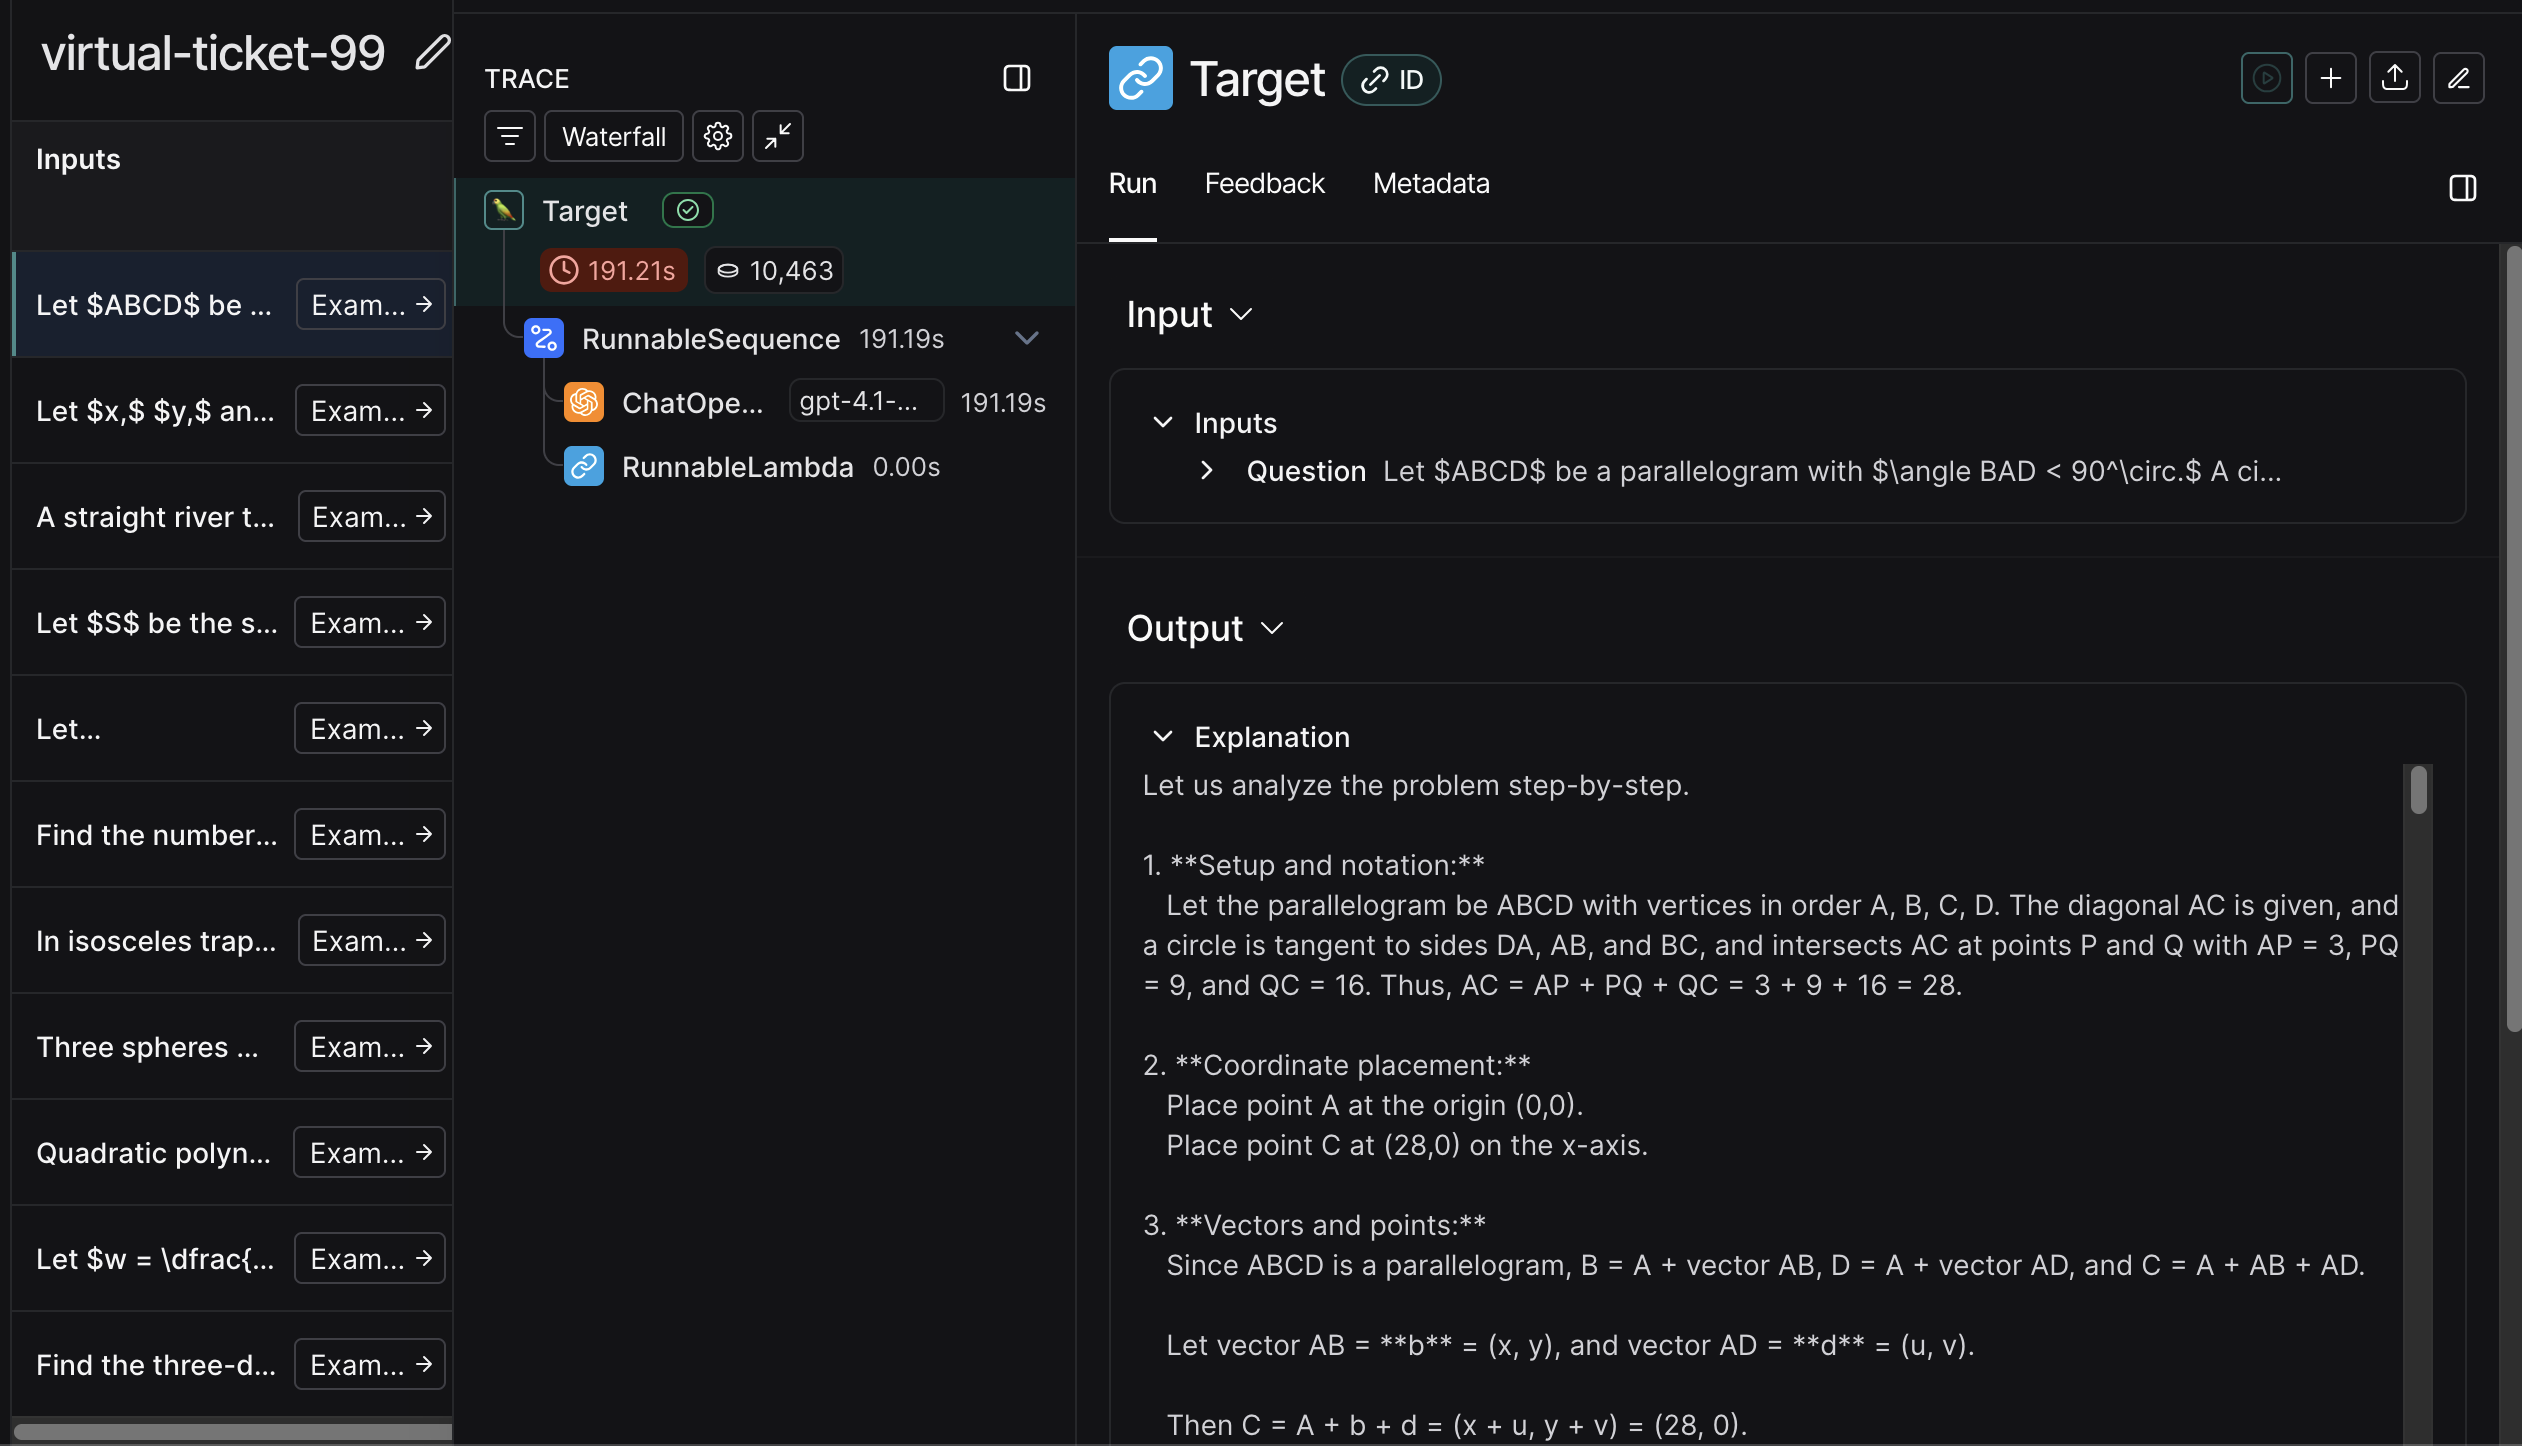
You can also investigate single runs:
Or see how results look over time:
Once again, I suggest you go explore the results in the LangSmith UI.
Conclusion
That’s all! We’ve covered the basics of using LangSmith to trace and evaluate your LLM applications.
By now, you should have a good understanding of how to create traces, define evaluation metrics, and run experiments.
If you have any questions or feedback, let me know in the comments below.
Citation
BibTeX citation:
@online{castillo2025,
  author = {Castillo, Dylan},
  title = {LangSmith 101},
  date = {2025-08-10},
  url = {https://dylancastillo.co/posts/langsmith-101.html},
  langid = {en}
}
For attribution, please cite this work as:
Castillo, Dylan. 2025. “LangSmith 101.” August 10. https://dylancastillo.co/posts/langsmith-101.html.